



In my previous post, I laid the groundwork for extending the development environment by running a collection of small functions at startup time. If you’ve not read that post yet, I recommend doing so before you continue!
So far, my extensions have been generally applicable. I’ll move onto things that are specific to the Windows IDE, as that’s where I spend my days. That said, it might still be interesting to you even if you don’t use Dyalog on Microsoft Windows. For example, shortcut keys can be configured in Ride, and the font can be used in Ride and in your terminal emulator of choice.
A Font Face I Can Read
The first thing any APLer wants is a font that renders the glyphs properly and at a comfortable size. You might expect to set this in a configuration parameter – but you can’t; the session font and size are not configuration values. The traditional route is to choose them from the UI and then save the session file, but it is easy to automate making these choices every time we start. For the font, setFont drives the real controls, exactly as if I had used them with mouse and keyboard:
∇ setFont
 ⍝ Set font face and size
  :With ⎕SE.cbtop.bandtb5.tb
      font.Text←'APL387 Unicode'
      ⎕NQ font'Select'
      size.Value←17
      ⎕NQ size'Change'
  :EndWith
∇
⎕SE.cbtop.bandtb5.tb is the toolbar band that holds the font name combo (font) and the size spinner (size). For each control, you need to assign the new choice, then fire a Select event to make the change take effect.
Did you spot the 7 instead of 5? You might find it strange that I don’t use the traditional default APL385 Unicode font. I personally prefer the new APL387 Unicode, which was drafted by a professional type designer as a successor to the venerable APL385 Unicode. The new font is now being refined and the up-to-date revision is installed with every new build of Dyalog v20.0. By the way, Madeline Vergani was the very first applicant to receive a grant from The APL Trust, and it was for this project. It is, in my opinion, the cleanest our beloved glyphs have ever looked:
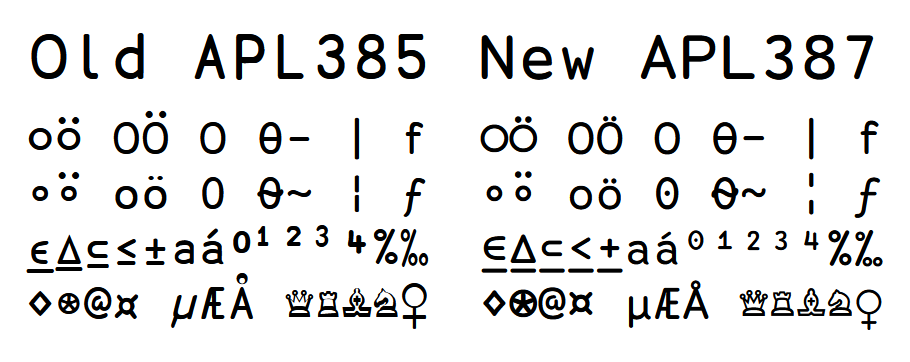
Comparison of APL385 Unicode and the new APL387 Unicode.
In the above image, the first two lines below the titles illustrate APL387’s superior distinguishing of glyphs that could potentially be confused, the next line shows APL387’s more consistent design, and the final line shows examples of where APL387 just has nicer glyph shapes.
In Ride, you can set the font face permanently in the Preferences:
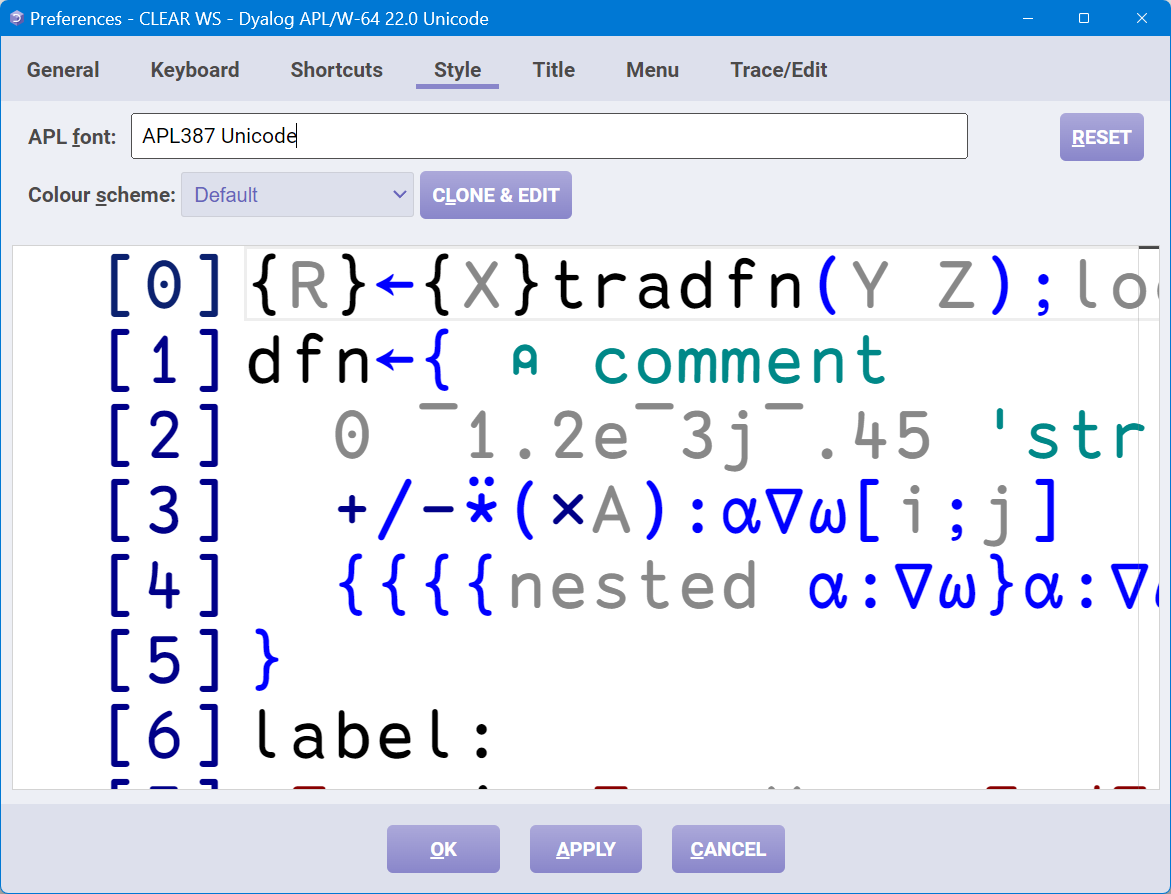
Ride: Preferences>Style>”APL font”
In and Out
setFont also settled on a size, but where the face is a set-and-forget choice, the ideal size depends on the situation. When I show my APL session during a video call or presentation, I usually need to increase my Session font size; conversely, I sometimes want a smaller font size to get an overview of a large piece of code, a large array, or a text-form diagram printed into the Session. These contradictory requirements mean that I like having font size controls at my fingertips:
∇ extViewMenu;ZC
 ⍝ Extend View menu with Zoom items
  ZC←{(⊃⍵)⎕WC'MenuItem'(2⊃⍵)('Event' ⋄ 'Select' 'Resize',3⊃⍵)('Hint' ⋄ 4⊃⍵)('Accelerator' ⋄ 5⊃⍵)}
  '⎕SE.mb.view.sep'⎕WC'Separator'
  ZC¨(
      '⎕SE.mb.view.larger'  'Zoom &In'   1 'Make text larger (Ctrl+=)'  (187 2)
      '⎕SE.mb.view.smaller' 'Zoom &Out' ¯1 'Make text smaller (Ctrl+-)' (189 2)
  )
∇
ZC (for Zoom Create) is a small helper function that removes repetitive parts of the code. When the event specification has a third element after the event name and callback function, like 'Select' 'Resize' 1, the third element is used as the left argument to the callback function. That function is Resize in our case, which, like setFont, works on the native control. It uses the size spinner’s own list of sizes rather than guessing at point values:
∇ a Resize e
 ⍝ Resize Session font
  ;font;idx;new;sizes
  font←⎕SE ⎕WG'Font'
  sizes←⎕SE.cbtop.bandtb5.tb.size.Items

  idx←a+sizes⍸⍥{⌈⍵÷2}2⊃font
  new←sizes⊃⍨1⌈idx⌊≢sizes

  ⎕SE.cbtop.bandtb5.tb.size.(Value Thumb)←new idx
  ⎕NQ ⎕SE.cbtop.bandtb5.tb.size'Spin'idx
∇
This locates the current size’s location (with fuzzing) within the spinner’s Items, takes one step in the requested direction (while protecting against leaving the range), and writes it back into the control, then fires a Spin event so the session re-renders. Because the control owns the list of legal sizes, I can never land on one it wouldn’t have offered. Anyway, this is what my View menu looks like now:
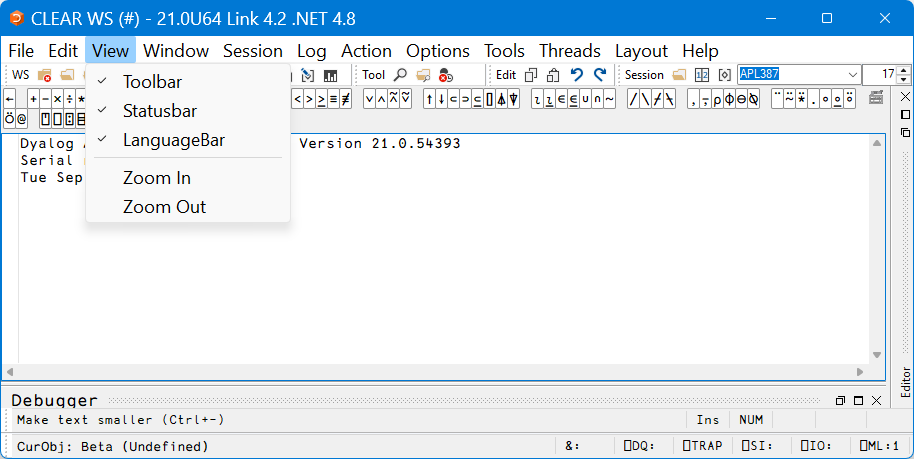
What my View menu looks like after running extViewMenu
⎕PFKEY doesn’t reach Ride, but Ride’s own Preferences>Shortcuts accepts many of the same command codes if you’d like to reproduce the effect there; it allows you to assign any keystroke to an “F-key” too. (However, you don’t need to go through F-keys to have two keystrokes for a single action; Ride allows assigning multiple keystrokes to each action.) Ride also already has keyboard shortcuts for zooming in and out, and resetting the zoom:
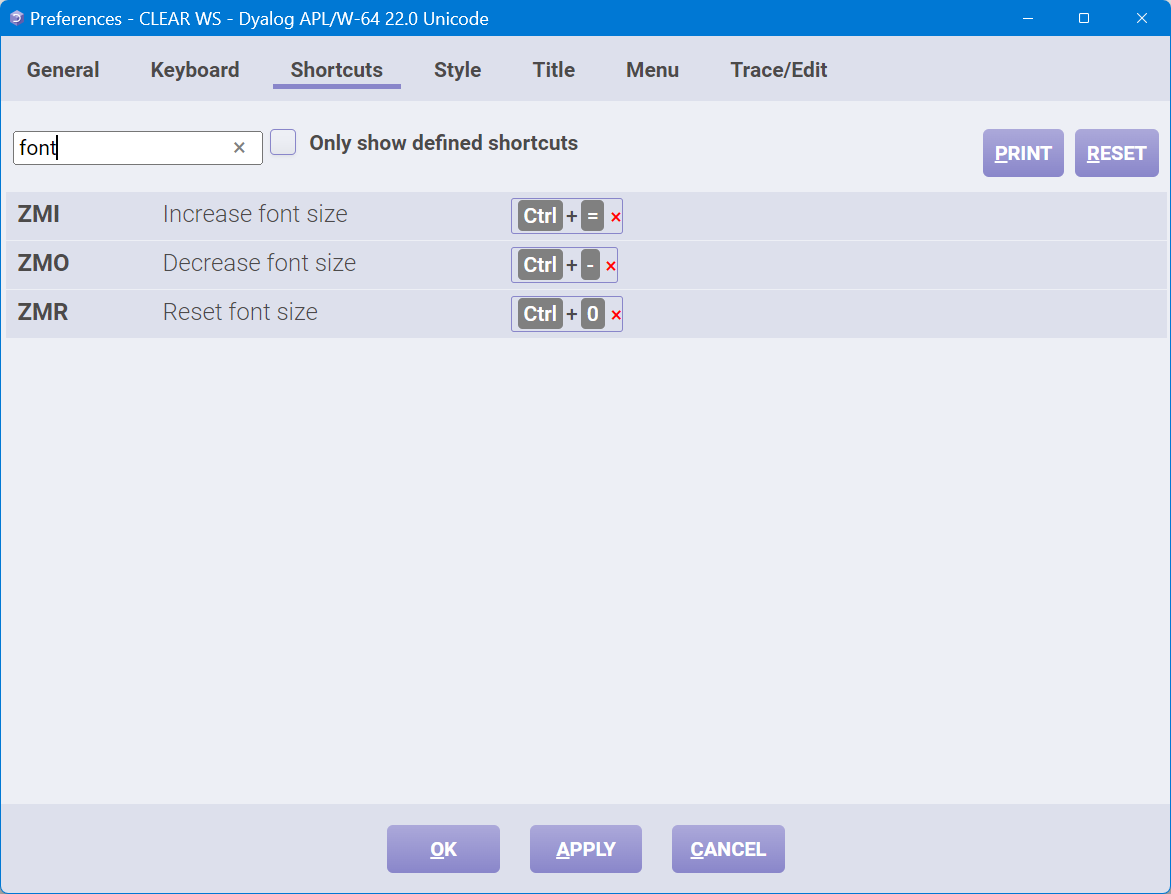
Ride: Preferences>Shortcuts>”font”
Function Keys Revisited
In 2018 I employed ⎕PFKEY to let the Tracer run up to a chosen line: I click on the line I’m interested in, which moves the text caret there, and the Tracer then executes up to that line and stops — a quick way to skip ahead to the part I actually want to inspect. In the 2020 follow-up I added the ability to select (part of) an expression in the Editor and have it executed in the session without (apparently) leaving the Editor. Both of those keys live on in setFKeys, alongside a good many friends (ignore the keystrokes mentioned in the comments for now – I’ll explain those in the next section):
∇ setFKeys
 ⍝ Set various F-keys
  ;PF
  PF←{}⊆⍛⎕PFKEY⍨

  5 PF' ' 'DB'                  ⍝ Mark for execution   F5
  6 PF'CP' 'JP' 'PT' 'ER' 'JP'  ⍝ Run selection in session  F6

  13 PF')' 'LL' '(' 'RL'  ⍝ Parenthesise left  Ctrl+0
  14 PF']' 'LL' '[' 'RL'  ⍝ Bracket left       Ctrl+]
  15 PF'}' 'LL' '{' 'RL'  ⍝ Brace left         Ctrl+}

  10 PF'BP' 'RM' 'TC' 'BP'       ⍝ Trace to here    F10
  34 PF'BP' 'RM' 'TC' 'BP' 'TC'  ⍝ Trace into here  Ctrl+F10

  43 PF'OP' 'IL'       ⍝ Insert open line below  Ctrl+I
  44 PF'ER' 'BK' 'RL'  ⍝ Execute and recall      Alt+Enter

  45 PF'BK'  ⍝ Ctrl+Z
  46 PF'FD'  ⍝ Ctrl+Y

  47 PF'Lw' 'DI'  ⍝ Delete word left   Ctrl+BkSp
  48 PF'Rw' 'DI'  ⍝ Delete word right  Ctrl+Del
∇
A word on the numbers: ⎕PFKEY programs numbered Programmable Function keys, but only some of them are literally function keys. So, while, for example, 5 and 6 are F5 and F6, numbers above 12 refer to shifted keys:
13through24are Shift+F1 through F1225through36are Ctrl+F1 through F1237through48are Ctrl+Shift+F1 through F1248through96are as above, but while holding Alt
The whole function is held together by the first line: ⎕PFKEY takes the shortcut keys and symbols on the left and the F-key number on the right. However, I prefer to write the number on the left, so I assemble a tiny tacit function:
- Commute (
⍨) flips the arguments so I can give the number on the left. - Behind (
⍛) allows nest (⊆) to ensure that the (new) left argument (the shortcut keys) is nested. This is so that a single code like'BK'is treated as if I’d written⊂'BK'– a small notational nicety that lets the single-code keys read as cleanly as the rest. - The leading
{}swallows the returned result (the previous value for the F-key) so that the function is silent.
In Ride, some of these come pre-assigned. Many others can be constructed by typing key sequences into the input fields for PFn entries under Preferences>Shortcuts, where you can also assign any keyboard combination:
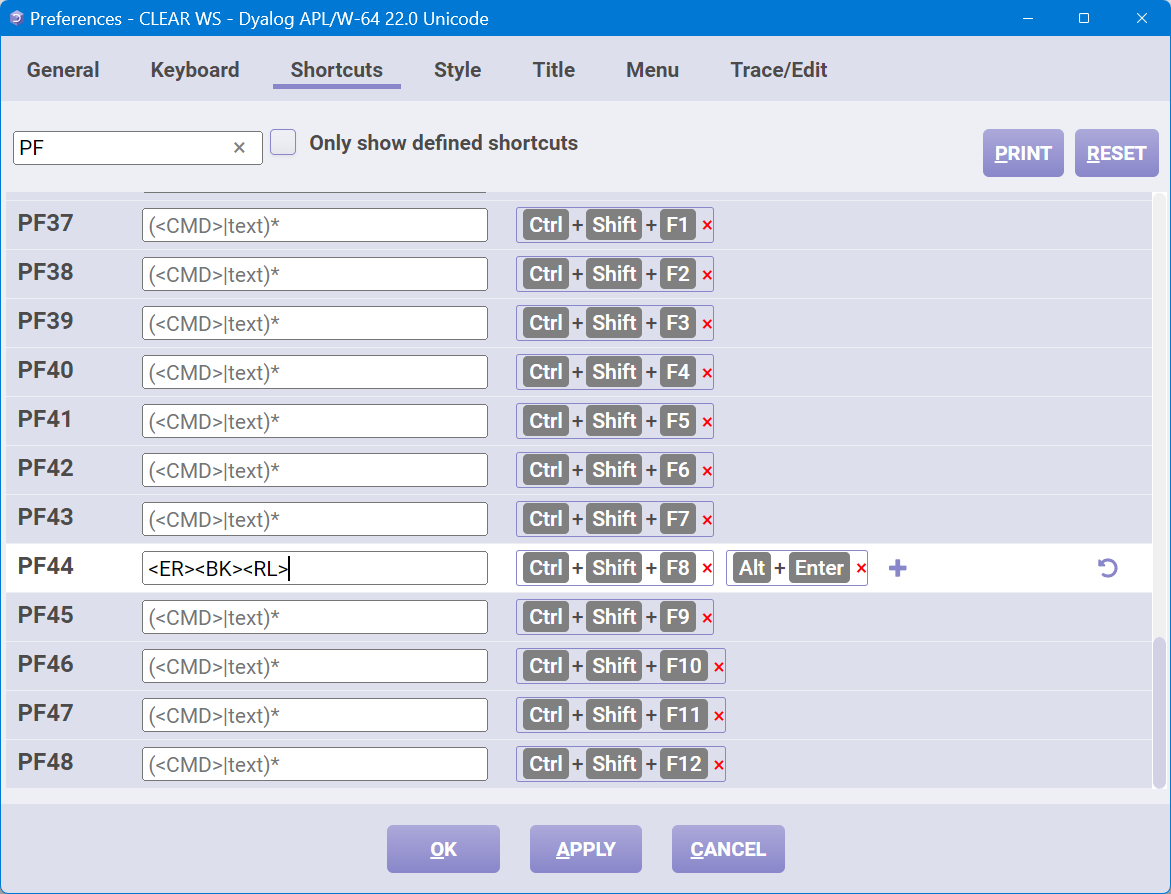
Ride: Preferences>Shortcuts: “PF”
Keyboard Shortcuts
Options>Configure…>Keyboard Shortcuts allows us to assign custom shortcuts for the “keys”, up to number 48, to something more comfortable. That’s what I do with 13, 14, and 15; reassigning them to Ctrl+0, Ctrl+], and Ctrl+} for the three “wrap” keys (parenthesise/bracket/brace from here to the left), Alt+Enter to execute the current line and recall it for further tweaks (good for teaching), and Ctrl+Backspace and Ctrl+Delete to delete a word left or right (these are virtually a standard, but Dyalog’s IDE doesn’t have them as available commands).
Why am I assigning F-keys 45 and 46 to <BK> and <FD> when these actions can already be given keyboard shortcuts? Because they serve double (actually, triple!) duty: They both navigate the Session input history (and skip backwards/forwards in the Tracer) and Undo/Redo edits. In my head, those are completely different concepts, and everywhere else I use Ctrl+Z and Ctrl+Y for Undo and Redo, so I’d like to use them as such in Dyalog too — while simultaneously keeping the default keystrokes Ctrl+Shift+Backspace and Ctrl+Shift+Enter for navigating Session history and lines in the Tracer. By way of an unused F-key, I can have two keystrokes for the same shortcut!
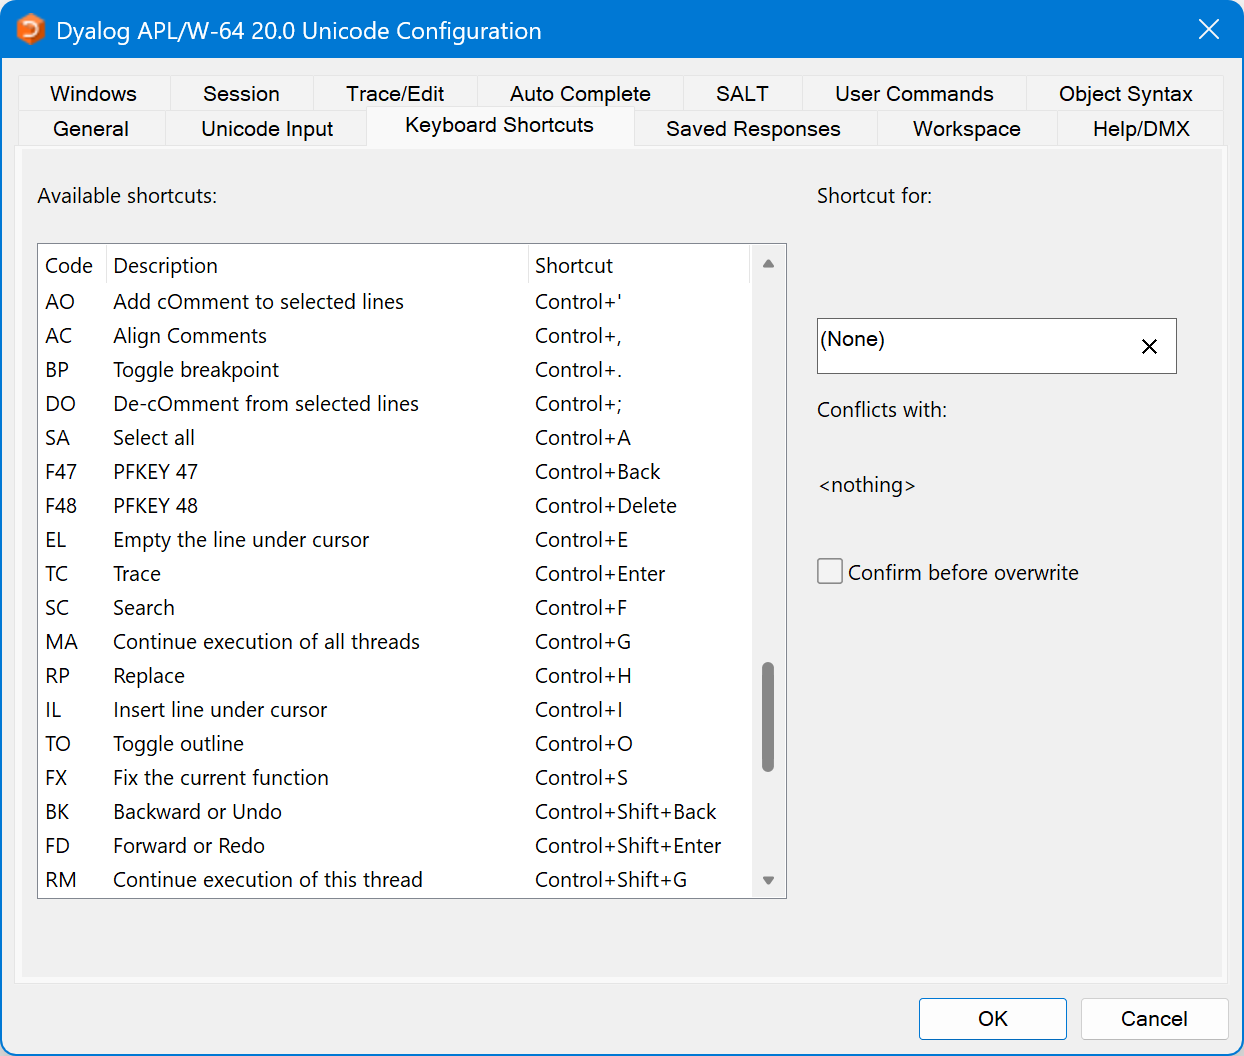
My Preferences window, showing many of my shortcuts that use the Ctrl key.
To Be Continued…
So far in this post, I have tuned the font, put zoom controls within reach, and reprogrammed a batch of keys. In the next post of this series, I’ll enhance the Windows IDE title bar and status bar. In the meantime, the easiest way to install everything is to paste all the function definitions from this series into a clear workspace and enter (with the directory that’s appropriate for you):
]LINK.Export # C:\Users\adam\Documents\Dyalog APL-64 20.0 Unicode Files\StartupSession\seextIf any of this is useful to you, take it. If it doesn’t quite do what you want, adapt it. If you have an idea for additional Session extensions, let me know!
 Follow