In February 2026, the APL Challenge quietly launched its next round on a rewritten stack. The previous infrastructure was retired and replaced by something considerably smaller and, I think, much more pleasant to maintain. This blog post describes how we got here, and shows off some of the Dyalog v20.0 idioms that shaped the rewrite along the way.
A short tour of competition history
Dyalog Ltd has been running some form of programming contest for 17 years now, and almost every era has had its own stack.
2009-2012 – Email: The earliest competitions were essentially mailing lists: Brooke Allen seeded the very first World Wide Programming Competition with the first twenty Project Euler problems, and entrants emailed in their solutions. Subsequent International APL Programming Contest rounds described the tasks on the main Dyalog Ltd website. The 2011 winner, Joel Hough, observed that most popular programming languages had a “Try X” website that let newcomers experiment without installing anything, and that APL didn’t. Participation was restricted to those who could prove their student status; participants also needed to apply for a free educational licence. They could only access the full Dyalog product (and start solving problems) once the application was approved and they had downloaded and installed the system. Joel’s suggestion led directly to the creation of TryAPL, significantly lowering the bar to entry.
2013-2018 – StudentCompetitions/Sqore: Task descriptions and submissions moved onto the third-party platform StudentCompetitions (later renamed Sqore), and the title went through a period of flux, eventually settling on the APL Problem Solving Competition, emphasising APL as a problem solving tool over the mechanical programming aspects. The problems were split into two “phases”: Phase 1 consisted of ten “one-liner” problems while Phase 2 had a PDF specification of more complex problems and included a template for answering. There wasn’t much code involved on our side, but submissions arrived in inconsistent formats and weren’t sandboxed in any way, so each one had to be inspected (and possibly reformatted by hand) before it could be run. We used Phase 1 as a filter; you could only enter Phase 2 if you had correctly answered a minimum of one problem from Phase 1. We wrote ad-hoc code for testing at least parts of Phase 2. From 2014, we also allowed non-student participants, but they could only win a free trip to the next user meeting, and not a cash prize like the student winners.
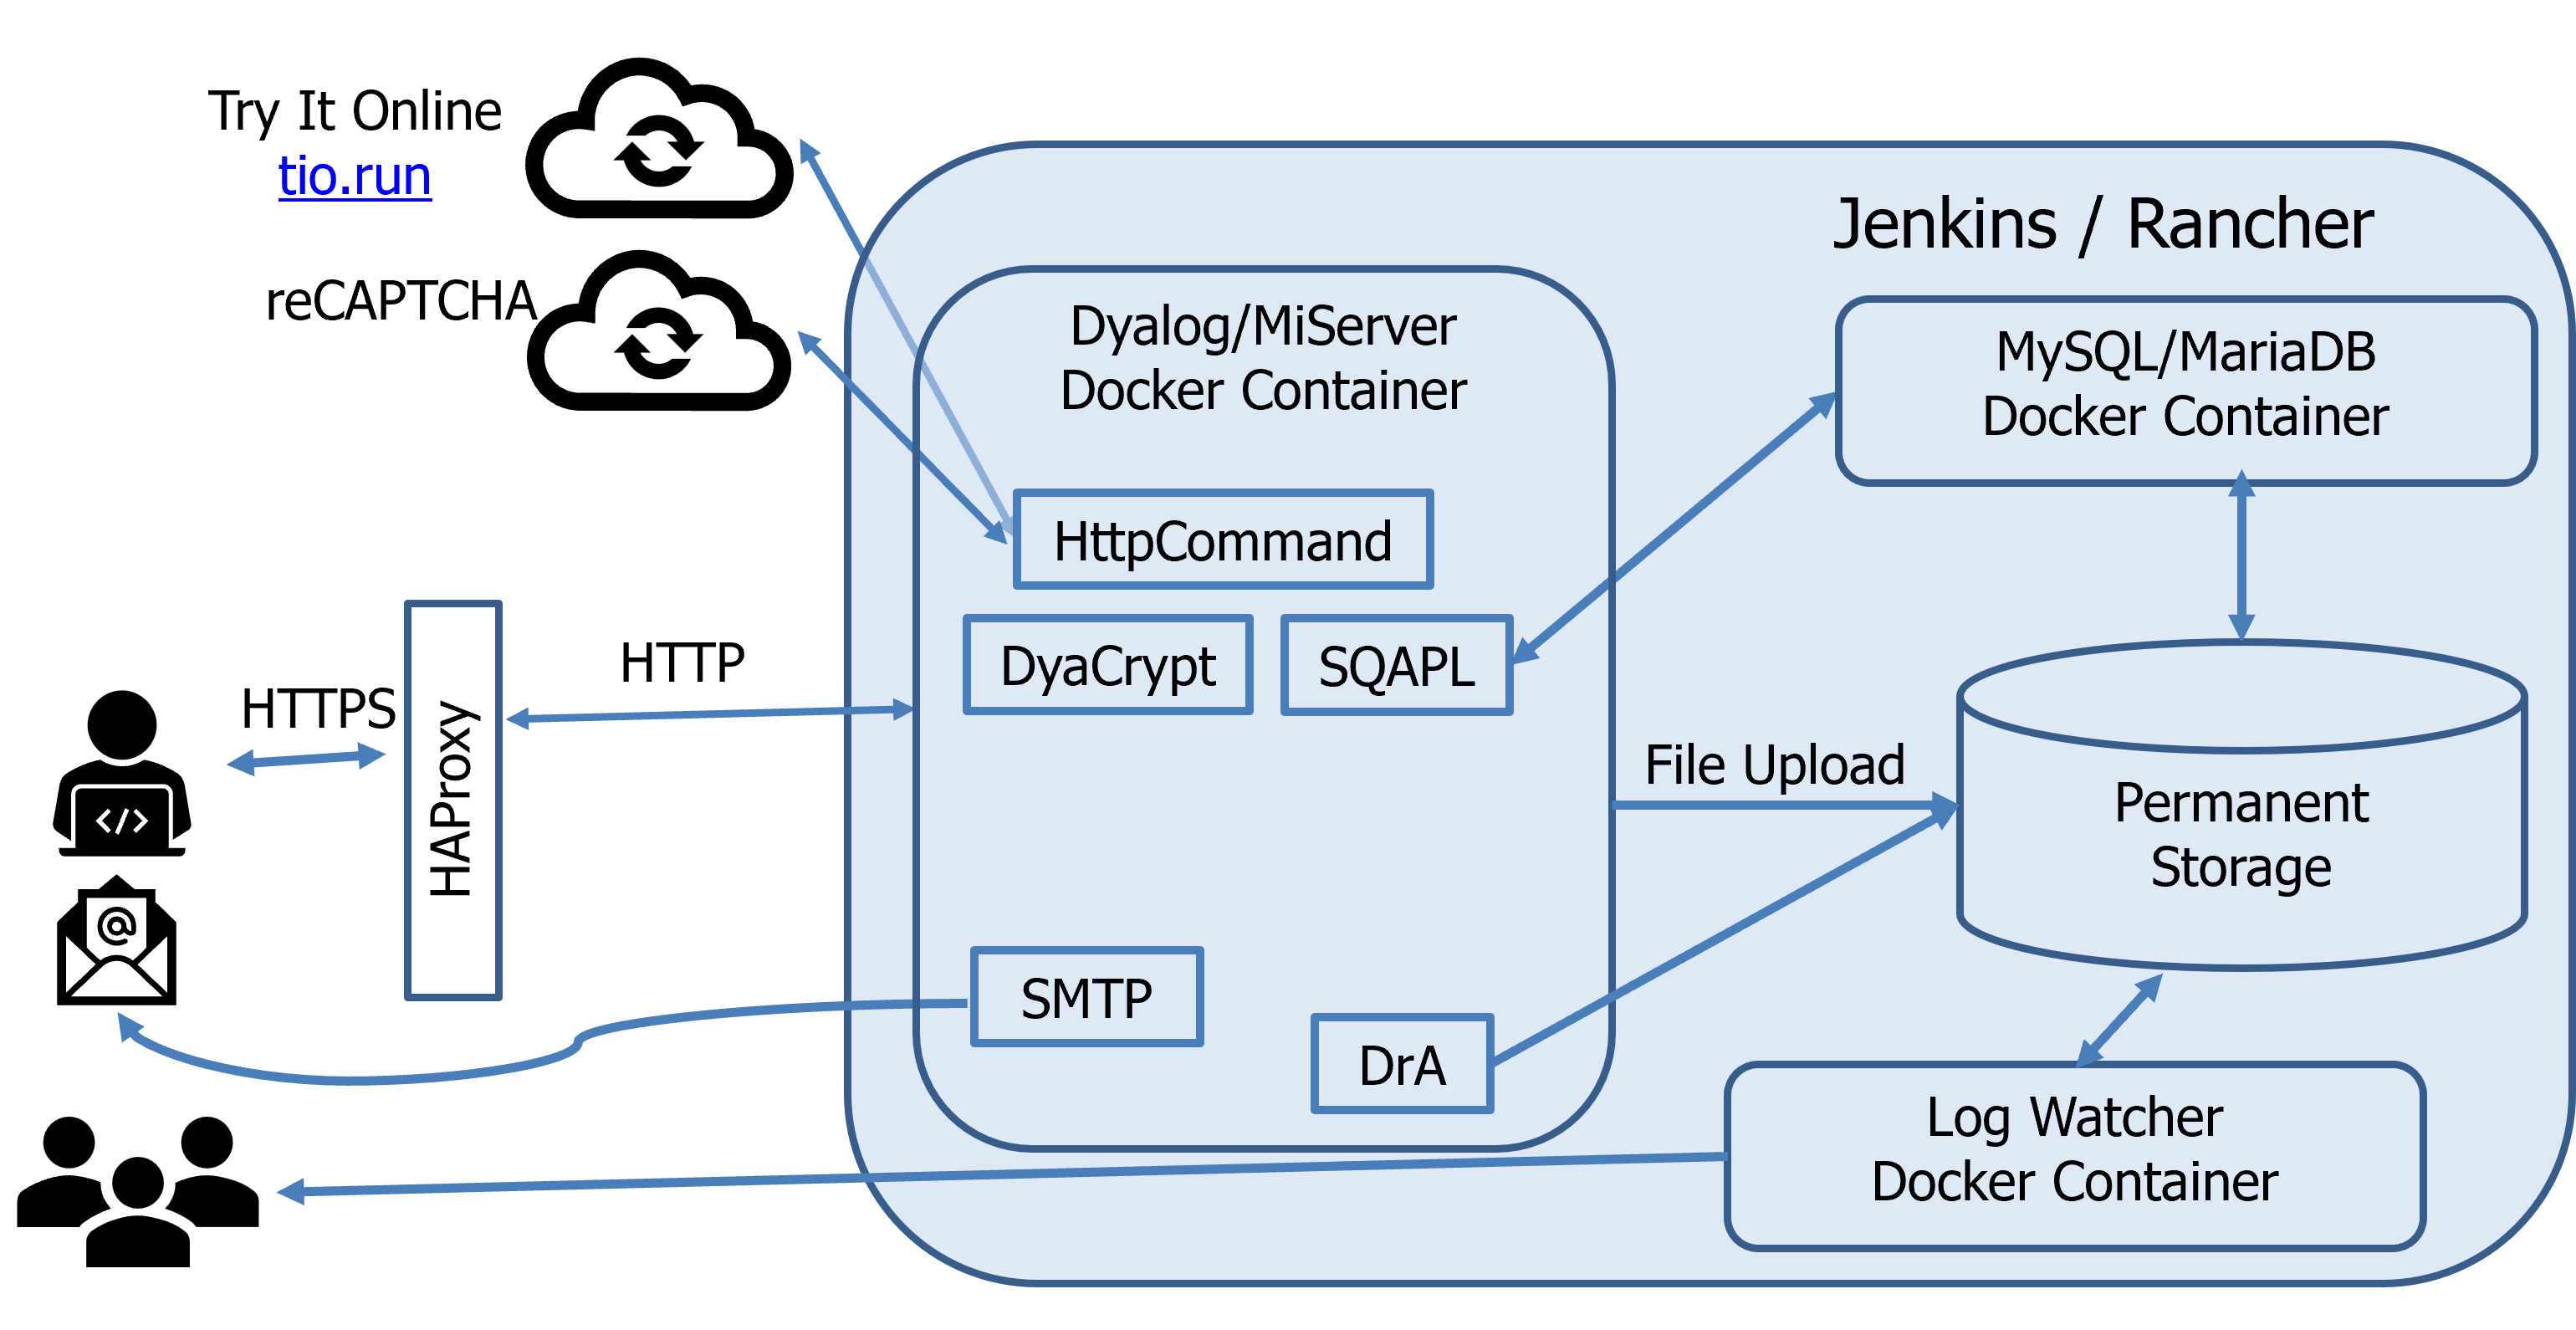
2019-2021 – Back in-house: The contest moved onto Dyalog-grown infrastructure. Almost everything we could write in APL, we wrote in APL:
- MiServer generated and served the website
- HttpCommand talked to remote services
- SMTP sent confirmation emails
- DCL hashed passwords
- Conga provided network communications for both MiServer and HttpCommand
- DrA logged and reported errors to the developers
- SQAPL communicated with a MariaDB database
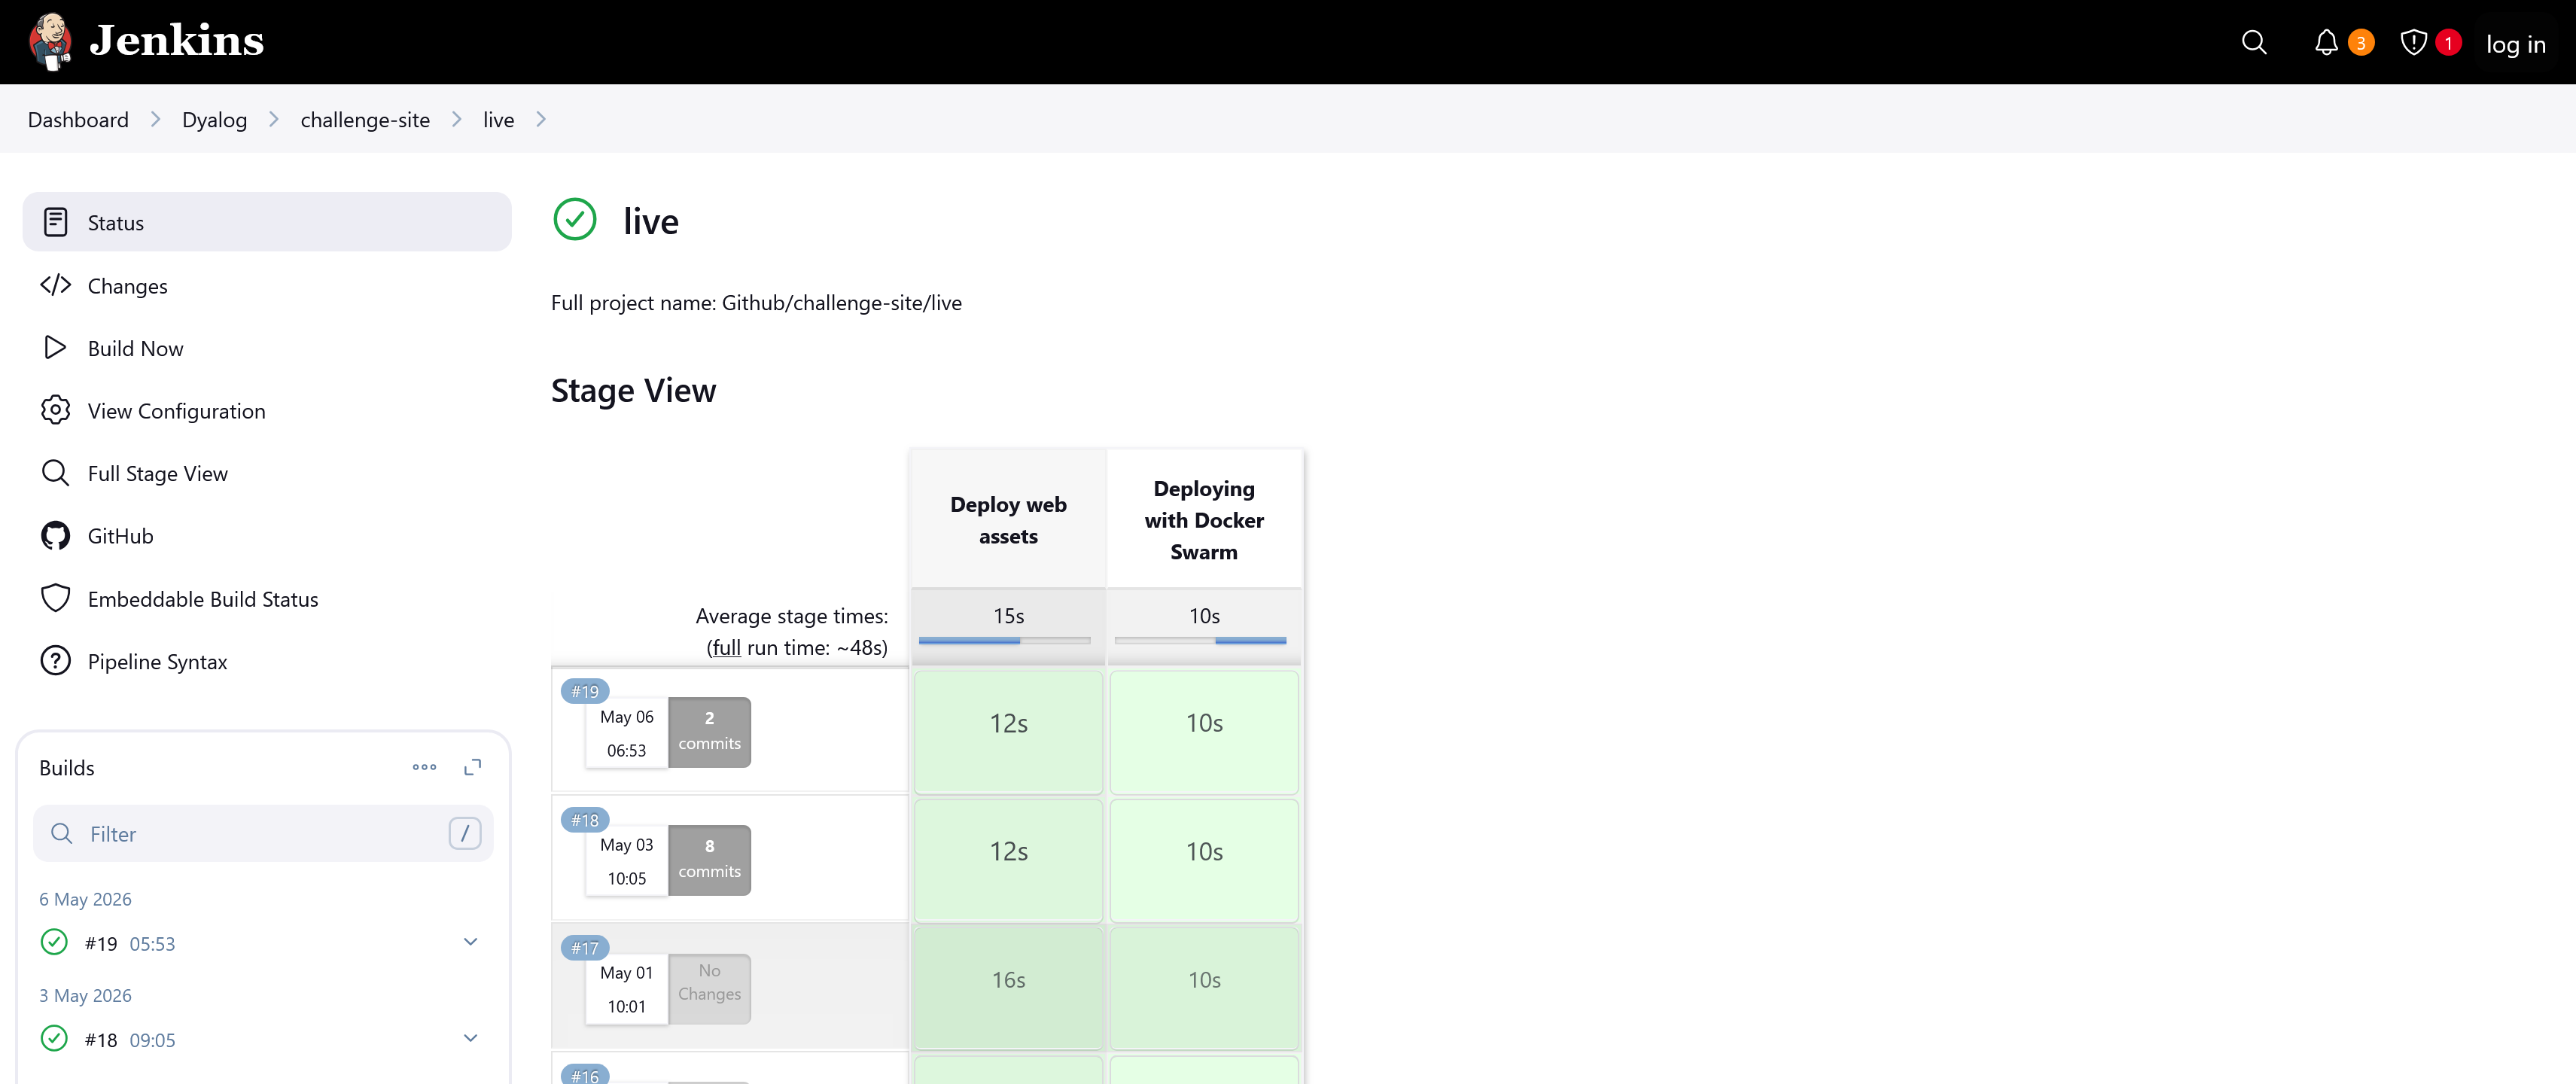
This is what it looked like:

The sources were managed with Git and stored on GitHub in two repositories: one which held the MiSite code and styling, and one which held the per-round JSON test specifications and per-problem MiPages. The intention was that Jenkins’ continuous integration using Docker containers deployed using Rancher (and later Docker Swarm, when Rancher went all-in on Kubernetes) would make content updates hot-swappable into a running site. In practice, this never worked reliably and content pushes regularly required a service restart anyway, and the split added co-ordination overhead between the two repositories.
We used HAProxy for load balancing and reCAPTCHA to keep the bots out. Phase 1 validation was done by generating test scripts which were then sent to Try It Online for sandboxed execution. Phase 2 was a glorified file upload form. Brian Becker showed a simplified diagram of the moving parts in his Dyalog ’19 presentation:
2022-2023 – Enhancements: The Try It Online dependency was replaced with Safe Execute, itself derived from the original TryAPL code, and bespoke checks were added to verify that submitted Phase 2 entries followed the syntactic constraints of each task. Code quality still factored into the final score, so the automated tests were one input among several.
In his introduction to the competition prize-giving ceremony during Dyalog ’23, Brian outlined our thoughts for the future of the competition.
Enter the APL Challenge
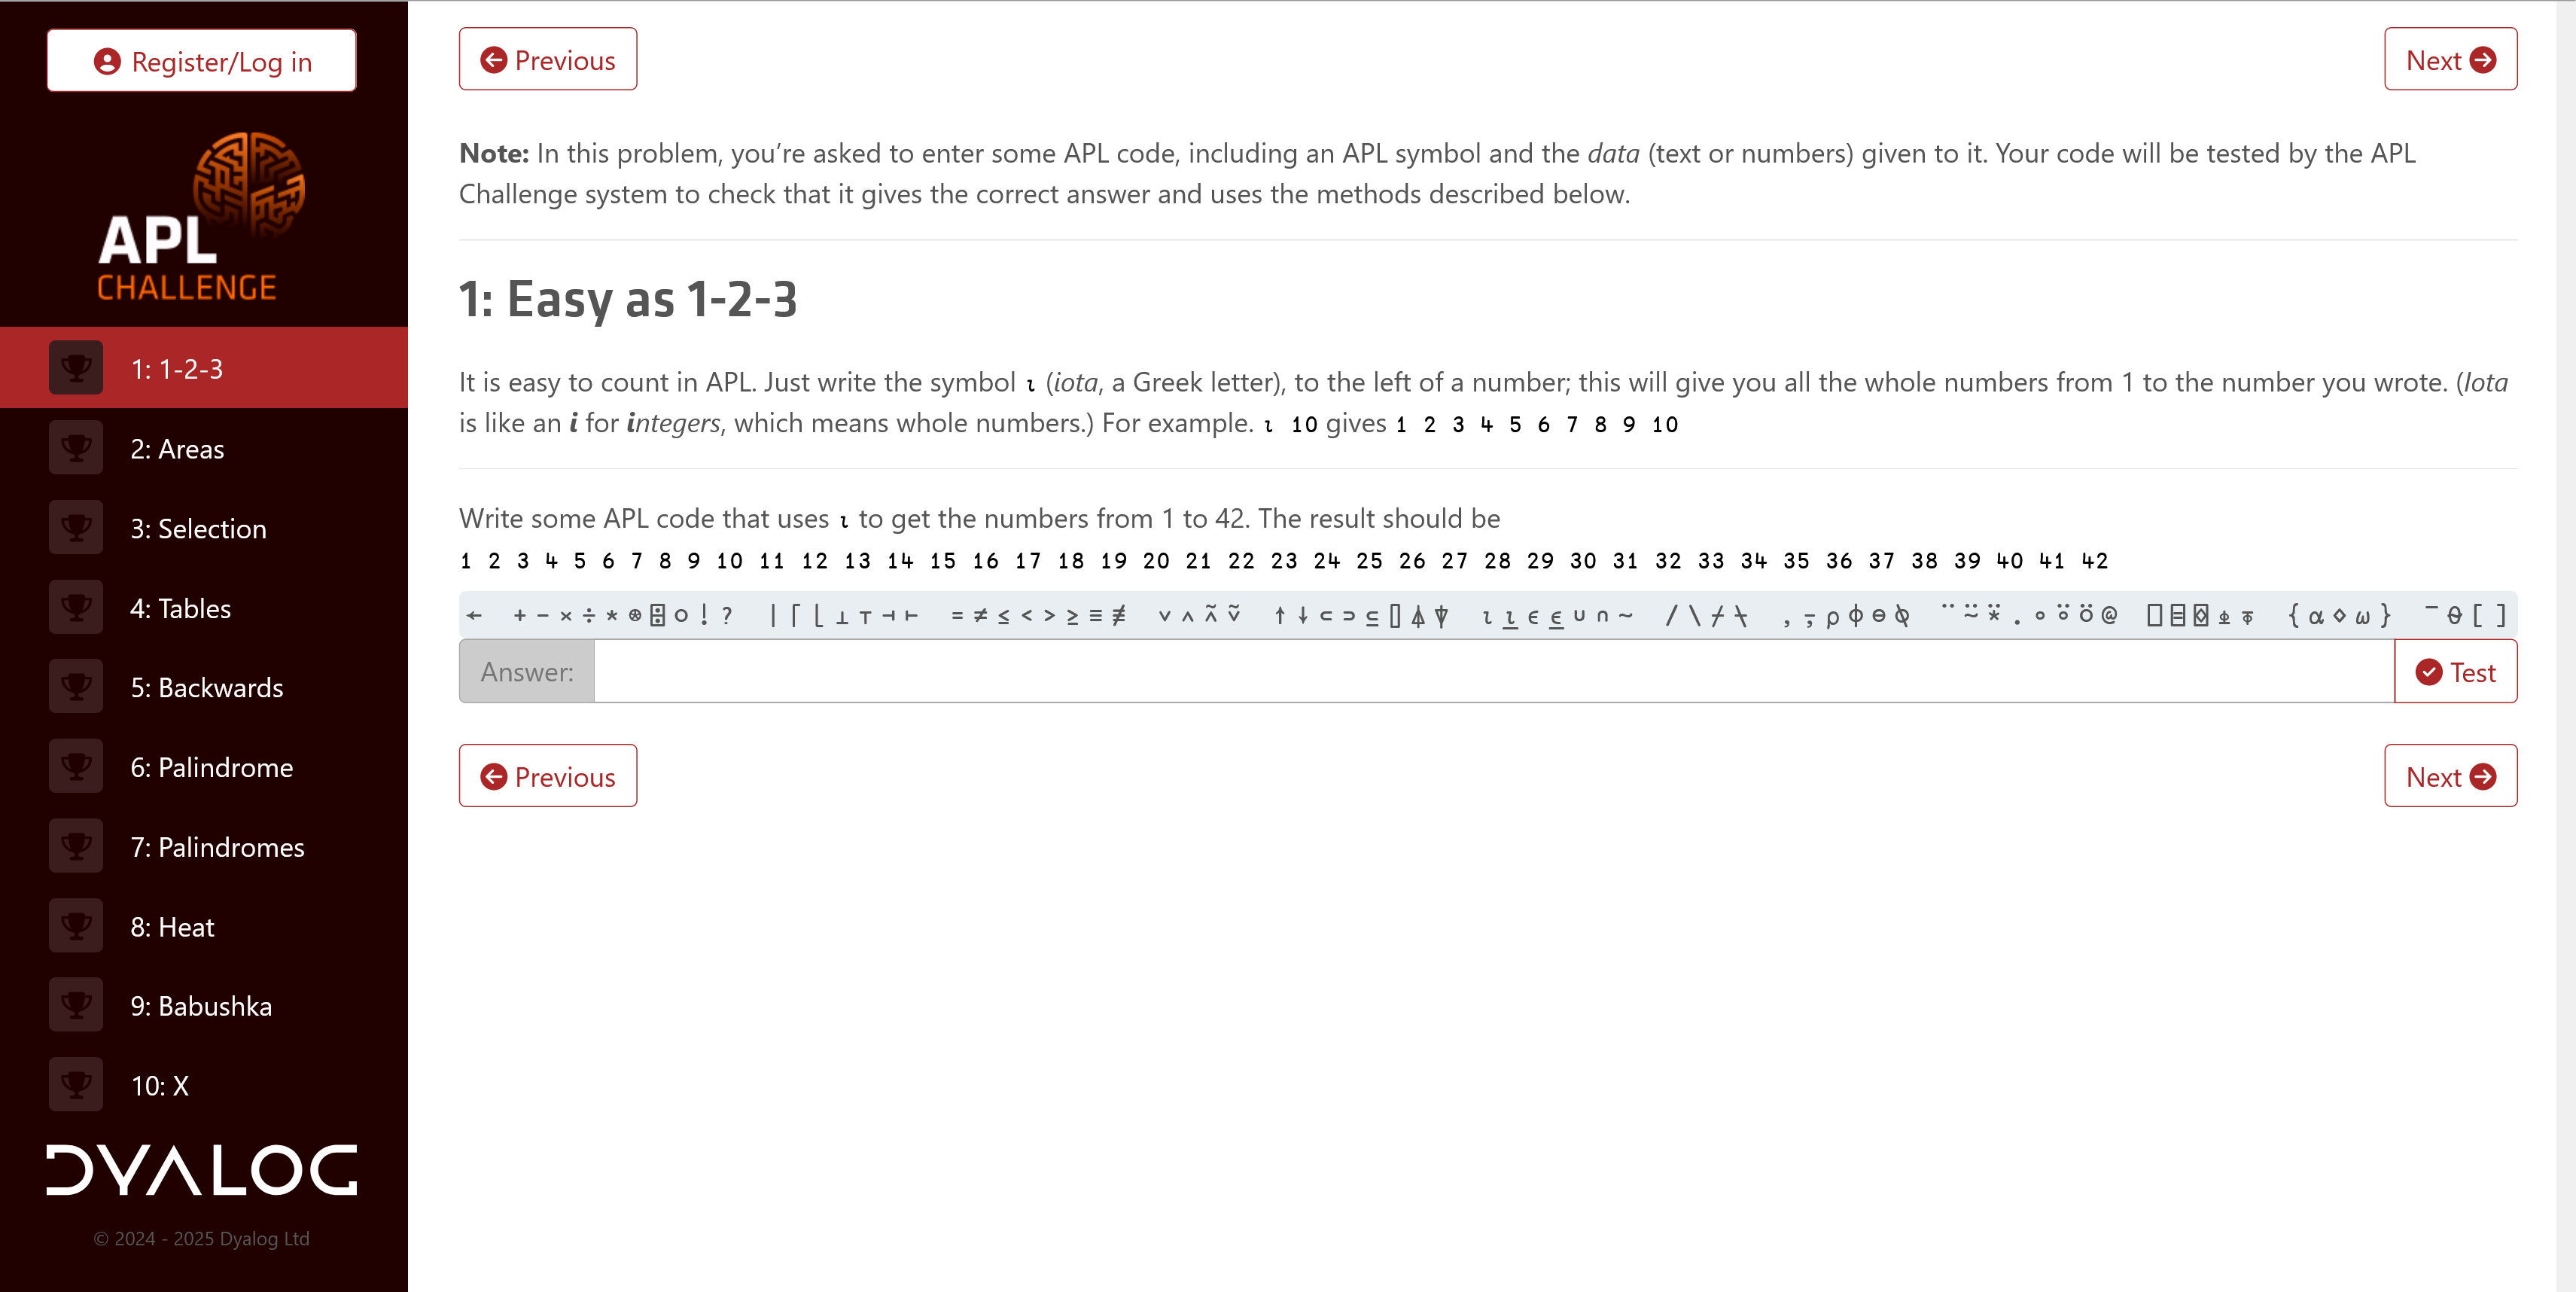
In February 2024 we launched the first round of the APL Challenge, replacing the previous Phase 1. After a short break, Phase 2 also got a replacement: The APL Forge. The competition was now:
- for everyone: While previous competitions exclusively or primarily targetted students, the APL Challenge is equally open to everyone. To facilitate participation by younger, new-to-APL, and foreign-language contestants, its descriptions of APL features and problems are deliberately written in a simplified style.
- always open: Previously the competition was open for a few months each year. The APL Challenge is open (almost) continuously, with four rounds each lasting three months (with only a day’s down-time between them), and each round is followed by the awarding of prizes.
- self-contained: Previously, you had to learn APL on your own to be able to participate. With the APL Challenge, each round teaches everything that is needed as part of the problem statements, building up to a more demanding tenth problem (often inspired by – or lifted directly from – the old Phase 1 archive).
- entirely automated: Every submission is quickly and fully checked, with prizes awarded only based on correctness.
Initially, we recycled the existing server set-up, including the account system and the Phase 1 code for presenting problems and checking submissions. However, that code had already accumulated a significant amount of technical debt, and the changes needed to repurpose it didn’t help. MiServer’s performance characteristics meant that we had to run several parallel containers behind a load balancer, and the automated checker was slow because each submission was juggled across threads. When I showed the APL Challenge to a couple of classes at my children’s school, I also noticed that the account system was a significant barrier: the children either had no email addresses of their own, or couldn’t access them during school hours, which halted the sign-up flow before it began. Although none of this was really broken, it was a consideration for the list of “things to clean up when there’s time”.
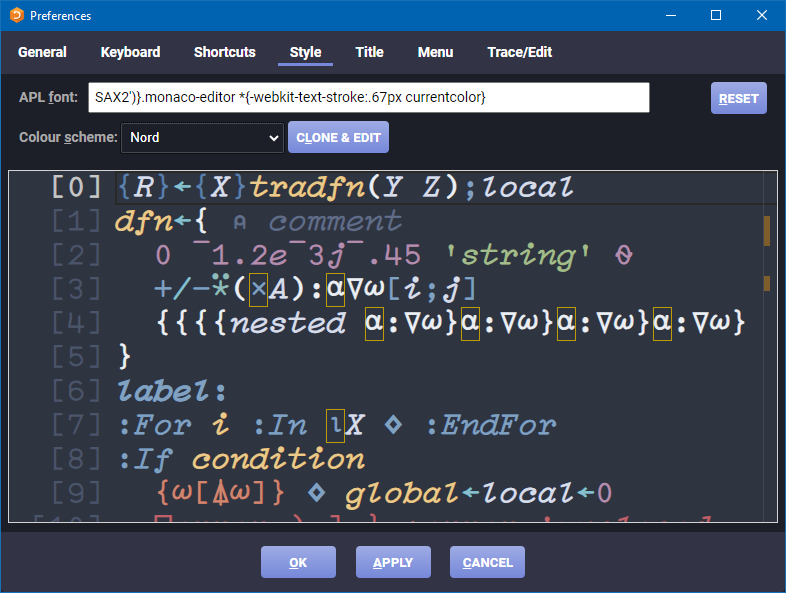
The front end of the site was also redesigned to align more closely with modern styling:
In late 2025 I finally found the time we needed. With Dyalog v20.0’s release approaching, I incorporated several of the key features introduced in that release into my rewrite – especially ⎕VGET, the enhancements to ⎕NS, array notation, and the behind operator (⍛), but even the new ⎕SHELL found a use in the code base. Most of the code is fairly straightforward, but one section constructs APL expressions, including single-line dfns, at run time to put the participant’s solution into an appropriate testing context. Traditional debugging tools fell short here, but inline tracing came to the rescue. The result has been live since February 2026.
The new stack
We’d accumulated a lot of experience with Material for MkDocs from the online documentation overhaul for Dyalog v20.0 (compare it to the older v19.0 site it replaced) and from rewriting the APL Quest site, which hosts the old APL Problem Solving Competition Phase 1 problems. Both sites are static MkDocs builds, although the APL Quest does automated checking using an external fork of Attempt This Online, and both have proven straightforward to maintain. Reusing Material for MkDocs as the APL Challenge frontend was the obvious move. Combined with Jarvis for the backend and a small amount of dynamic content, the new stack is:
- APL code that builds a static site for each round using Material for MkDocs.
- Jarvis with one small enhancement, serving both the static site and a four-endpoint JSON API.
- HttpCommand to forward subscription requests to MailerLite.
- Conga for Jarvis and HttpCommand.
- Git, GitHub, Docker Swarm, and Jenkins (as before).
By adding Material for MkDocs and Jarvis, we were able to remove MiServer, SMTP, DCL, DrA, SQAPL, HAProxy, Rancher, MySQL/MariaDB, reCAPTCHA, Safe Execute, the load balancer, the multiple container replicas, the dual-repository arrangement, and seven JavaScript libraries used by the MiSite code.
The database was replaced with two TSV (Tab-Separated Values) files in persistent storage. Authorisation, where it exists, is a token that is compared to an environment variable.
After some deliberation, and consulting with our in-house GDPR experts, we also found a way to remove the need to register: the participant’s email is now submitted along with each solution. This let us remove the whole signup-password-confirmation-email procedure, so children at school can use their own (or their parents’) email address without needing access to it immediately, and only receiving an email if they win a prize.
The entire backend is now just over 400 short lines (averaging less than 25 characters) of APL across 16 functions, plus one namespace of 35 English phrases (we plan on adding internationalisation later). For comparison, the previous site used over 2,000 lines of APL and eight files of English phrases and email stubs.
One static site for each round
Each round teaches a different progression of glyphs and concepts. Rather than rendering pages dynamically, we build one Material for MkDocs site for each round. Each round lives in its own uppercase single-letter directory (A through I, with Z reserved for the holding-period site that’s served between rounds). The previous system identified rounds by calendar slots (2024’s round 1 was 20241, and so on). Decoupling round identity from the schedule means that a given round can be re-served later and a round can be designed and tested entirely independently of when it goes live.
A single copy of the shared files and folders – assets, JavaScript, and the legal and front pages – are kept in add/. Before the MkDocs build runs, these are copied into each round’s directory and {{X}} placeholders in markdown files are substituted with the round letter:
 dirs←⊃⊢⍤//1=@1⊢1 0 ⎕NINFO ⎕OPT 1⊢dir,'/?'
 Copy←{
     dest←d,'/',⍺
     ⎕←'COPY -',(2↓∊' & '∘,¨⊆⍵),' → ',∊1 ⎕NPARTS dest,'/'
     dest ⎕NCOPY ⎕OPT'IfExists' 'Replace'⊢(dir,'/add/',⍺,'/')∘,¨⊆⍵
 }
 ls←⊢/¨dirs
 incl←ls∊build
 :For d l :InEach incl∘/¨dirs ls
     ''Copy'mkdocs.yml' 'overrides'
     'docs'Copy'ass' 'js' 'legal.md','index.md'/∘⊂⍨'Z'≠l

     files←(0∊2∘⊃∊⎕D⍨)¨⍤⎕NPARTS⍛/⊃⎕NINFO ⎕OPT 1⊢d,'/docs/*.md'
     :For file :In files
         cont←⊃⎕NGET file 1
         file 1 ⎕NPUT⍨⊂'{{X}}'⎕R l ⎕OPT'Regex' 0⊢cont
     :EndFor

     :If build∩0 1
         {⎕←⍵}¨⊃⊃⎕SHELL ⎕OPT'WorkingDir'd⊢'python -m mkdocs build'
     :EndIf
 :EndFor
A hot-swappable Jarvis
Jarvis serves a static directory using its HTMLInterface setting. However, that setting was defined as a field that was read once when the server starts, and we needed to be able to switch which round’s site/ directory was being served while the server was running, on a fixed UTC schedule. So we amended Jarvis to make HTMLInterface a property: assigning to it now adjusts the private fields that were previously only set at boot time.
That small change is what makes the rest of the design work; round switching is a background thread that watches a single TSV file:
 :Repeat
     :Trap 0
         newChange←13 ⎕NINFO filename
         :If change≢newChange
         :OrIf 0∊40 ⎕ATX'utc' 'dir'
             change←newChange
             (utc dir)←⊃(TSV ⎕OPT'Invert' 2)filename ⍬ 1 1
             inst.Log'Schedule loaded from ',filename
         :EndIf
         begin←1 ⎕DT(2⊃⎕VFI)¨' '@(~∊∘⎕D)¨utc
         interval←begin⍸now
         :If 900⌶0
             newRound←interval⊃dir
         :EndIf
         :If round≢newRound
             round←newRound
             html←⌽round@7⊢'/',(⊃∊'/\'⍨)⍛↓⌽inst.HTMLInterface
             inst.Log'Web interface changed: ',inst.HTMLInterface,' → ',html
             inst.HTMLInterface←html
             file←inst.CodeSource,'/',round,'.json5'
         :EndIf

         newTestFileInfo←FileInfo file
         :If fileInfo≢newTestFileInfo
             fileInfo←newTestFileInfo
             inst.Log'Test data updated from ',file
             data←0 ⎕JSON ⎕OPT'Dialect' 'JSON5'⊃⎕NGET file
         :EndIf

         :If ~900⌶0
             :Leave
         :EndIf
         t←20 ⎕DT'Z'
         ⎕DL 1+1800|¯1-t ⍝ wait until next half-hour
     :Else
         …
     :EndTrap
 :EndRepeat
Every half an hour, the thread re-reads schedule.tsv if its modification time has changed. If the round that should be live differs from the one currently being served, then the HTMLInterface property is updated; the corresponding test data is then (re-)loaded if either the test data file or the round has changed. The schedule itself is a two-column TSV mapping UTC start times to round letters:
utc                 dir
…
2026-01-30 09:00    Z
2026-02-11 09:00    G
2026-04-30 08:00    Z
2026-05-01 08:00    C
2026-07-31 08:00    Z
2026-08-02 08:00    H
…
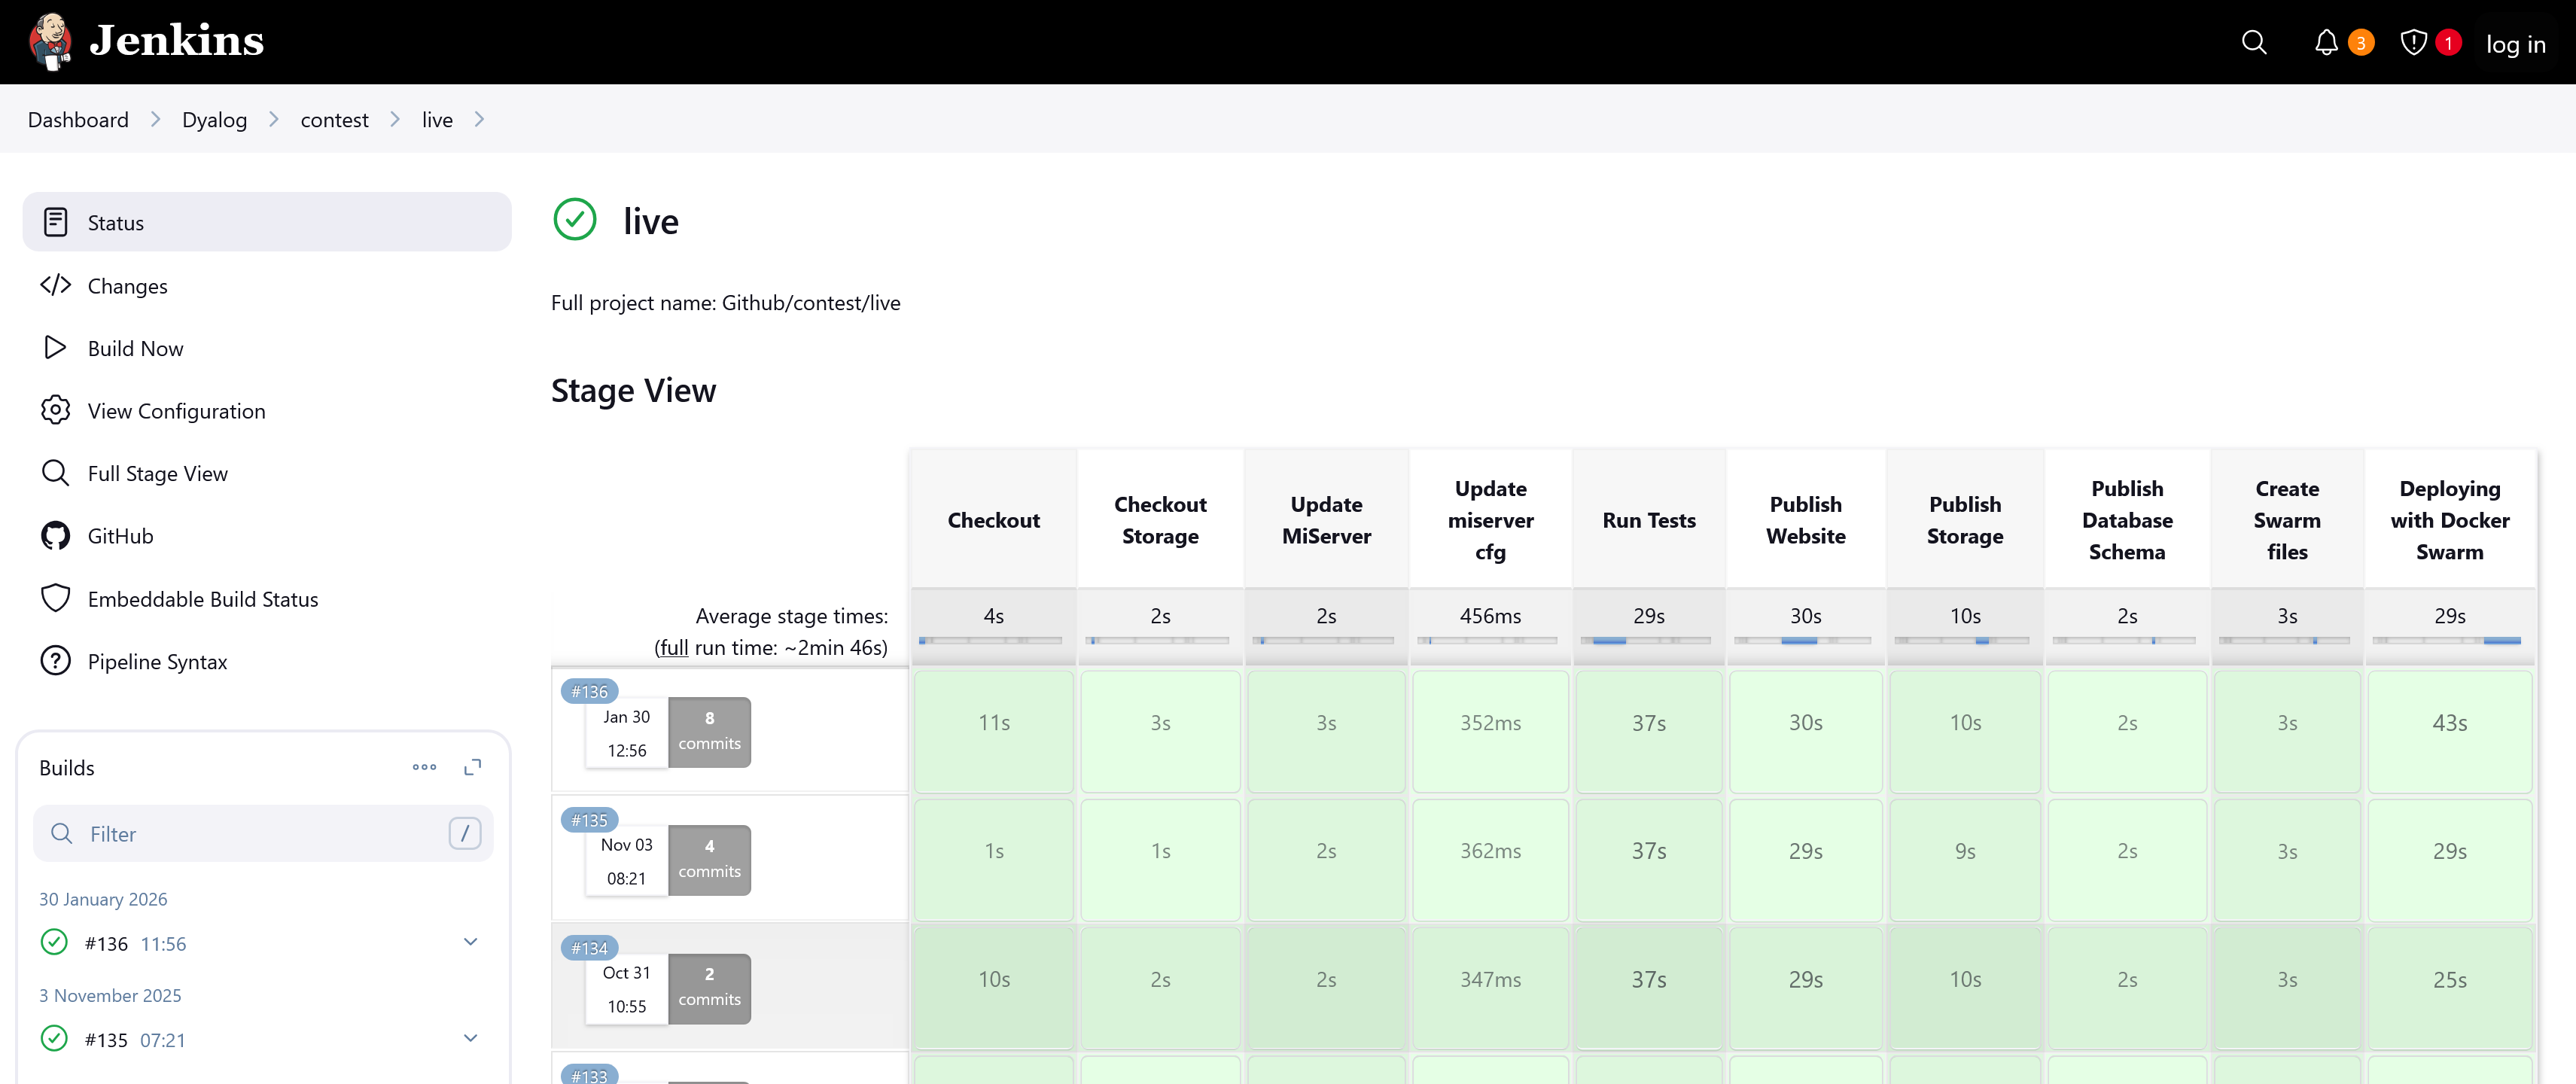
Editing this file is the entire process for scheduling rounds. There’s no separate content repository, and there’s no longer an aspiration to swap content underneath a running site without telling the site about it. The builds tend to take less than 30 seconds, and the live site is swapped with only a few seconds of downtime:
A huge improvement over the previous architecture:
The JSON5 test catalogue
Each round has a JSON5 file with members P1 through P10 describing how to test each problem. The format was inherited from the MiServer-based system; the test framework that consumes it has been completely rewritten. Here’s part of one:
{
    P1: {
        r:"^ *⍳ *\\d+",
        s:"⍳24",
    },
    …
    P7: {
        a: [
            "'HELLO'",
            "'DYALOG'",
            "'APL'",
            "{⍵[?≢⍵]}¨'AEIOU' 'BCDFGHJKLM' 'NPQRSTVWXYZ' 'AEIOU'",
        ],
        f: "{(2⊃⍵),(2⊃⌽⍵)}",
    },
    …
}
Problems 1–6 ask the participant to type one specific expression that produces one specific value, so the specification carries a reference solution s and a regex r that describes the acceptable solutions. Problems 7-10 ask for a function: the specification carries a reference function f, an array of test arguments a, and (optionally) a preprocessor p to apply before comparing the user’s result with the reference’s. Since the JSON5 strings are APL expressions, we can generate random tests as needed to prevent participants from hard-coding answers.
Submitting an answer
JavaScript included in the frontend makes the user’s browser POST [lang, problem, code, email] to the /Submit endpoint. First, we do some sanity checking:
 (rc msg)←req Submit(lang problem code email);anon;T
 lang ⎕C⍨←¯3
 :If ~lang⊂⍛∊##.⎕NL ¯9
     lang←'en'
 :EndIf
 T←lang∘Text
 :If 'Z'≡round
     (rc msg)←8(T'closed')
 :ElseIf ~problem⊂⍤,⍤⍕⍛∊⍕¨⍳10
     (rc msg)←8(T'badProbNo')
 :ElseIf 0∊∊' '=⊃0⍴⊂code
     (rc msg)←8(T'badCode')
 :OrIf 255<≢code←∊code
     (rc msg)←8(T'longCode')
 :ElseIf 0∊∊' '=⊃0⍴⊂email
     email←'^\s+|\s+$'⎕R''∊email
 :OrIf (''≢email)∧⍬≡'\S.*@.*\S'⎕S 3⊢email
 :OrIf email∊⍨⎕UCS 9
 :OrIf 254<≢email
     (rc msg)←¯8(T'badEmail')
 :Else
     …
We then test the submission and add an entry to the sub[mission]s and, if correct, wins database files:
     …
     (rc msg)←'data' 'problem' 'lang'⎕NS⍛Test code
     …
     ((unixtime:20 ⎕DT'Z' ⋄ code:'\t'⎕R'␉'⊢code)⎕NS'problem' 'rc')AppendTSV dbDir,'/subs.tsv'
     :If 0=rc
         req.Server.Log anon,' solved ',round,' problem ',problem
         :Hold 'wins'
             'email' 'problem' 'round'⎕NS⍛AppendTSV dbDir,'/wins.tsv'
         :EndHold
     :EndIf
 :EndIf
Responses consist of a return code and a message, ready for the frontend to render as a Material admonition:
The submission record uses two new Dyalog v20.0 features:
(unixtime:20 ⎕DT'Z' ⋄ code:'\t'⎕R'␉'⊢code)⎕NS'problem' 'rc'
The parenthesised expression is a namespace literal containing unixtime and code with their value expressions, and ⎕NS'problem' 'rc' amends the reference left argument (new!) with copies of those two variables. The result is a four-member namespace, ready to be appended as a TSV row. I chose to pass the row as a namespace rather than an ordered vector so that the table column order wouldn’t matter.
The test harness
Test is the largest function in the codebase (110 lines), but mostly consists of validation; the actual evaluation is short. The function begins with more usage of new Dyalog v20.0 features:
 (rc msg)←params Test code;…
 ⎕THIS ⎕NS params
 :Trap ⎕VGET⊂'debug' 0
     T←lang∘Text
     spec←data ⎕VGET⊂'P',problem
     …
⎕THIS ⎕NS params merges the entire params namespace into the current function’s scope, so data, problem, and lang (set up by the caller in Submit) are now ordinary local names with no params. qualifier required. data ⎕VGET⊂'debug' 0 decides whether to trap unexpected errors at the top level (during development, I set debug←1 from the session), and ⎕VGET then reads the specification for the requested problem out of the test data.
When initial validation is complete, the function proceeds based on the type of specification that was supplied (a regex-and-value check for problems 1-6, or a test-cases-and-function check for 7-10) and (after more specific validation) either runs the user’s code with ()⍎ (to run it in a separate namespace) or composes a small expression that wraps the user’s function and the reference function side-by-side and runs both in turn. (Debugging the generated expression is where inline tracing came in handy for me.) If the answers match, the frontend gets 0 'Your answer is correct. Good job!'. Otherwise the message tells them whether the answer was wrong, the methods used were wrong, the symbols used were wrong, or the code crashed.
Security is delivered by a safe character set, which stops glyphs that are dangerous (⍎, ⎕, →, ⌶) or can lead to runaway execution (⍞, ∇, ⍣):
safe←'+-×÷⌈⌊*⍟|!○~∨∧⍱⍲<≤=≥>≠.@≡≢⍴,⍪⍳↑↓?⍒⍋⍉⌽⊖∊⊥⊤⌹⊂⊃∪∩⍷⌷∘/⌿\⍀¨⍨⊆⍥⊣⊢⍤⌸⌺⍸()[];⋄:⍛⍬{}⍺⍵¯ '
This, together with limited memory, makes the new system light-weight enough that we can run it in the main thread, thus saving on thread juggling.
Authorisation as a one-liner
There are only two protected endpoints – Table for reading the TSVs, and Purge for deleting records – both for our own administrative use. (Participants don’t authenticate at all; an email goes in with each submission, the browser remembers it client-side, and that’s it. The worst that can happen is that I submit a correct answer with your email address, and that you then get a single notification email about having won a competition you haven’t heard of. Your email is then purged from our systems.) A single dfn, evaluated once for each protected request, is sufficient:
Authorised←{(⊂⍵.GetHeader'AuthToken')∊(⎕VGET⊂'authToken' '' ⋄ Env'AUTHTOKEN')~⊂''}
The valid token is whichever of the variable authToken (set manually for local testing) and the environment variable $AUTHTOKEN (set by Docker from a Jenkins credential) is non-empty. ⎕VGET returns its default of '' if authToken isn’t defined. The request’s AuthToken header is compared against the resulting list.
The “database”
The two storage tables are TSV files. They’re created at server start if they don’t exist. The combination of :For…:In with multi-line array notation makes it easy to spot what goes where, whilst preventing the lines from getting too long:
 :For name head :In (
         'subs'('code' 'rc' 'problem' 'unixtime')
         'wins'('email' 'problem' 'round')
     )
     pathfile←dbDir,'/',name,'.tsv'
     :If ~⎕NEXISTS pathfile
         pathfile ⎕NPUT⍨[head ⋄ ]TSV''
     :EndIf
 :EndFor
[head ⋄ ] is array notation for a one-row matrix containing the row head – a header row. TSV is ⎕CSV with the separator pre-set to the Tab character and quotes disabled (Submit already protected us against Tab characters in the submission by replacing them with the Unicode control picture ␉):
TSV←⎕CSV ⎕OPT('Separator'(⎕UCS 9) ⋄ 'QuoteChar' '')
subs.tsv contains code, rc, problem, and unixtime – every submission, with no email column. wins.tsv contains email, problem, and round – correct submissions only, with no code column and no timestamp. The two tables share no column that would let you join a participant’s email to the code they typed. We can produce statistics (“how many people solved problem 7 of round G?”), and we can email prize winners, but we can’t, even ourselves, look at a piece of submitted code and say which person wrote it. That’s deliberate.
Appending a record is a one-liner that takes a namespace whose names match the table’s columns, slots the values into a fresh row in the right column order, and asks ⎕NPUT to append (2):
r←file 2 ⎕NPUT⍨[ns.⎕VGET⊃⌽(TSV ⎕OPT'Records' 1)file ⍬ 4 1 ⋄ ]TSV''
(TSV ⎕OPT'Records' 1)file ⍬ 4 1 reads only the header row (one record), and ns.⎕VGET then plucks the values out of the namespace in that order.
Reading a whole table for the administrative Table endpoint is:
resp←0 ⎕JSON 1 ⎕JSON⊂2(TSV path ⍬ 4)
Here, we read the file then round-trip through ⎕JSON to leverage a dataset wrapper – introduced in Dyalog v19.0 – that transforms a table into a vector of namespaces. To see what’s happening, here is a sample wins table:
      wins←[
            'email'           'problem' 'round'
            'foo@example.com' 1         'A'
            'bar@example.com' 2         'B'
           ]
      1 ⎕JSON⊂2 wins
[{"email":"foo@example.com","problem":1,"round":"A"},{"email":"bar@example.com","problem":2,"round":"B"}]
Jarvis will respond with JSON data, but does the conversion from APL array for us, so we preempt the double-conversion with 0 ⎕JSON. Yes, it is unnecessary work, but it happens rarely enough not to matter, and even with the round-trip it is faster than the alternative, more-involved, ⊃{()⎕VSET(↑⍵)⍺}⍤1/TSV path ⍬ 4 1.
Behind the scenes with ⍛
Dyalog v20.0 introduced the new behind operator, ⍛. This uses the left operand to provide a left argument to the right operand:
X f⍛g Y is (f X) g Yf⍛g Y is (f Y) g Y
This is a very common pattern, and across the 400-line backend ⍛ appears over 30 times. Here are some of the representative uses:
| New |
'data' 'problem' 'lang'⎕NS⍛Test code |
Make Test take a list of names representing a namespace,
rather than taking a namespace reference |
| Old |
(⎕NS'data' 'problem' 'lang')Test code |
| New |
lang⊂⍛∊##.⎕NL ¯9 |
Make ∊ look for a single whole text,
rather than for each letter |
| Old |
(⊂lang)∊##.⎕NL ¯9 |
| New |
mask~⍛/what |
/ means “filter in”; “keep the indicated”
~⍛/ means “filter out”; “remove the indicated” |
| Old |
(~mask)/what |
| New |
(∨/spec.s∘∊)⍛/¨groups |
⍛/ is a monadic filtering operator
f⍛/¨Y filters each element of Y by the predicate function f |
| Old |
((∨/spec.s∘∊)¨groups)/¨groups |
I especially like how ⍛ allows me to extend the primitive vocabulary of APL by providing oft-needed variants of existing primitives; X⊂⍛∊Y and X~⍛/Y and f⍛/Y could easily have been primitives in their own right.
Internationalisation
Responses to submissions, including both success and failure messages, as well as reports about internal errors in the system (luckily, we’ve only had one minor error, and it was due to a mistake in the frontend), are sent as plain human-readable text together with a return code. The frontend renders it as a Material-style admonition with the colour and icon determined by the return code. English phrasings live in an array notation namespace in the file en.apla:
(
 and:'and'
 ansCorrect:'Your answer is correct. Good job!'
 ansErr:'Error<p>Your answer caused a'
 ansPass:'Your answer passed all tests. Good job!'
 arg:'argument'
 as:'as'
 badEmail:'Invalid email address'
 …
)
Jarvis loads .apla files together with the other application code. Now, you might have spotted the line :If ~lang⊂⍛∊##.⎕NL ¯9 and thought that this looks error-prone; surely, a malicious actor could issue a POST with the language set to the name of an unrelated namespace! Worry not; the line lang ⎕C⍨←¯3 makes sure only namespaces with entirely lowercase names are reachable as language packs, while all the system’s top-level namespaces begin with a capital letter. Phew, close!
Adding a new language to the backend consists of adding one file. Of course, the problem statements and informational pages will also need translation, but Material for MkDocs supports internationalisation by having a separate directory per language. I only recently finished composing all nine planned rounds of content, and want to harmonise them a bit more before we begin translating, but at least the wiring is there.
Looking back and forwards
The previous stack was a very useful test of the code and tools that we supply: it exercised our libraries, gave us bug reports against our own tools, and kept us using what we were selling. However, it also accumulated technical debt, and as the system evolved, the seams started to show.
The new stack also uses Dyalog technology (Jarvis, HttpCommand, Conga, and most of the newest language features) and these are really the things we’re selling today. It does so much more economically too: the whole thing runs on a single virtual CPU with 512 MB of RAM, whereas the old system used at least two virtual CPUs (more during peaks) with 1 GB of RAM each.
Have a look at Jarvis! It is really easy to get started. Here’s the bare minimum to get from a clear workspace to a running service with a good architecture in a folder /rot (replace with any other folder you want to use instead):
- Design your API: We’ll make it really simple; create a single function
Rotate←{⊃⌽/⍵} in the workspace.
- Create the folder and function source file:
]Create # /rot
- Create the Jarvis configuration file: The easiest is
]Repr (CodeLocation:'.' ⋄ HTMLInterface:'.' ⋄ IncludeFns:'Rotate') -f=json -o=/rot/jarvis.json
- Create the HTML interface: Here’s one with two input fields, a button, and the minimal JavaScript needed to make the button work:
<!DOCTYPE html>
<html>
  <head>
    <title>Jarvis Text Rotator</title>
    <script>
      Exec=()=>{
        fetch("/Rotate",{
          method:"POST",
          headers:{"content-type":"application/json; charset=utf-8"},
          body:JSON.stringify([steps.valueAsNumber, text.value])
        }).then(r=>r.json()).then(d=>out.innerHTML=d)
      }
    </script>
  </head>
  <body>
    <input id=steps placeholder=Steps type=number>
    <button onclick=Exec()>⌽</button>
    <input id=text placeholder=Text>
    <br>
    <output id=out></output>
  </body>
</html>
Save this text to /rot/index.html.
- Get Jarvis:
]Get github.com/Dyalog/Jarvis/blob/master/Source/Jarvis.dyalog
- Start the server:
Jarvis.Run'/rot/jarvis.json'
- Try it: Open localhost:8080 in your browser, fill in the fields, and click the button!
Try HttpCommand, too! While the above server is running, we can easily use it as a micro-service, bypassing the HTML frontend:
- Get HttpCommand:
]Get HttpCommand
- Issue the command:
resp←HttpCommand.GetJSON'POST' 'localhost:8080/Rotate' (2 'Hello')
- Inspect the response:
resp.Data – this will give the character vector 'lloHe'
If you’ve made it all the way to here, congratulations! Don’t forget to promote the APL Challenge and the APL Forge – they are available year-round!


 Follow