
I’ve been wanting to run a Web Server from my home for many years. In fact, I have been paying for the domain Thor8.dk (my street address is Thorsvænget 8), and a fixed IP address for 5 years now – without getting it implemented. But today, with a little help from Jason Rivers who helped me set it up so it starts automatically on reboot, I have been able to deploy a MiServer – a web framework written entirely in Dyalog APL – on my Raspberry Pi (the one that is not embedded in the DyaBot) – at the address http://thor8.dk. Please be gentle with it, it is a very small machine on a regular ISP connection with only 1Mb upload capacity!
MiServer + Raspberry Pi = PiServer
The MiServer is a project that has been evolving for the last several years, with the goal of putting web application development in easy reach of those APL developers who are not also comfortable with mainstream web technologies like Microsoft IIS / ASP.NET, Apache, PHP etc. It is a web framework written entirely by APLers, for APLers – as an open-source project which is now available at https://github.com/Dyalog/MiServer. The motto of this project is that “Anyone who is able to write an APL function should be able to host it on the web”.
The site at “thor8” is a slightly modified version of the demo site that is included with the MiServer installation. Note that one of the features of the site is that, from any page, if you click on the Viking amulet in the top left corner, you can see the source code for the page. If you’d like to learn more about the MiServer, the User Guide is also available on GitHub.
The Mortgage Example
A contributing factor to my finally getting my act together this week is that Nick Nickolov’s NGN/APL project, is an APL interpreter written in CoffeeScript, sparked a thread that has been running on LinkedIn for a while, which included a discussion on alternative mechanisms for implementing web apps in APL. While I think Nick’s project is very cool, and I look forward to meeting him at Iverson College next week, I could not avoid feeling a powerful urge to demonstrate that it now straightforward to write interactive web sites using a state-of-the art, industrial strength APL system. Many thanks to Brian Becker, who has done most of the work on recent features of the MiServer (and is currently working on MiServer 3.0 which aims to make the development of web pages much more similar to desktop application development), for his assistance in putting together the example.If the PiServer is still up and running you can view the example at http://thor8.dk/mortgage. Here is an image, just in case it isn’t:
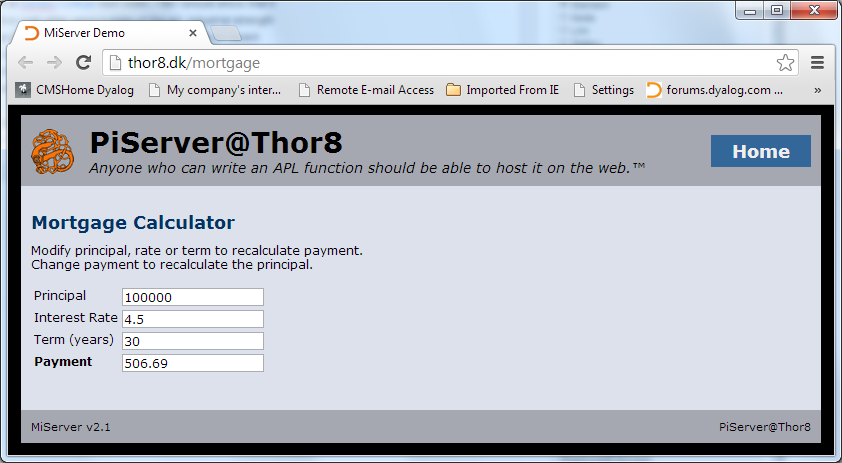
If you modify the principal amount, interest rate or the term, the calculator will calculate a new monthly payment. If you adjust the payment to something that you can afford, the principal amount will be adjusted accordingly.
The Code
As previously mentioned, if you click on the orange amulet at the top left, the code for the page will be displayed. I’d like to explain selected lines of the code here:
:Class mortgage : MiPageEvery MiServer Page (MiPage) is a Dyalog APL class which derives from the base class MiPage. This base class adds the CSS (style sheet) and behaviour like the display of code.
Public Fields
    :Field Public event         ⍝ the triggered event
    :Field Public what          ⍝ the id of the element
:Field Public prin←'100000' ⍝ principal field
:Field Public rate←'4.5' ⍝ rate
:Field Public term←'30' ⍝ term (years)
:Field Public pmt←'' ⍝ paymentThe main job of the MiServer is to move values arriivng from the browser, in the form of fields in an HTML form, or JSON data, to instance variables in your class. You need to name the fields that you want the MiServer to look for in order for this to happen (you can also retrieve other values using API function calls, but that is a longer story).
Application Code
tonum←{{(,1)≡1⊃⍵:2⊃⍵ ⋄ ''}⎕VFI ⍵} ⍝ check for a single number
calcpmt←{0::'Err' ⋄ p r n←⍵÷11200(÷12) ⋄ .01×⌈100×p×r÷1-(1+r)*-n}
calcprin←{0::'Err' ⋄ r n m←⍵÷1200(÷12)1 ⋄ .01×⌈100×m÷r÷1-(1+r)*-n}
These three lines of code are the actual application code – one function to compute the payment based on principal, rate and term – and another to calculate the principal based on the other three values.
Defining The Form
 inputs←1 2⍴'Principal'('prin'Edit prin)
 inputs⍪←'Interest Rate'('rate'Edit rate)
 inputs⍪←'Term (years)'('term'Edit term)
 inputs⍪←'<b>Payment</b>'('pmt'Edit pmt)
 html,←'id="mortgage"'('POST'Form)Table inputs
Within the function Render, which is called when the page is rendered, these lines of code create a 4×2 nested array containing labels in the first column, and HTML edit fields in the 2nd column. The function Table wraps an HTML table around this array and the Form operator wraps that inside a form which will use the POST method (although in this case, that actually never happens, we drive all activities of change events on the edit fields).
Wiring up the Callbacks
  selector←'#mortgage input'
  event←'change'
  returndata←'formdata' '#mortgage' 'serialize'
  html,←req #.JQ.On selector event returndata
These four lines of code set up a client-side JavaScript callback using a technology called JQuery, which will post a serialised copy of the form back to the server using an “AJAX” style transaction (we call it “APLJAX”). In a larger form we might want to be more selective about what we send back, but in this case the entire serialised form is still a very small amount of data.
Updating the Form
    :CaseList 'prin' 'rate' 'term'
       resp←('execute'('$("#pmt").val("',(⍕calcpmt p r n),'")'))
    :Case 'pmt' ⍝ payment changed, calculate principal
       resp←('execute'('$("#prin").val("',(⍕calcprin r n m),'")'))
The above lines are “the beef” in terms of the interaction: A response is constructed which will cause the value of either the pmt or the prin field to be updated, by sending a snippet of JavaScript back to the client to be executed dynamically.
We are actually working hard to eliminate the use of the above feature (the ability to execute JavaScript), because we don’t think most APLers will want to learn even this amount of JS. If you can make do with two buttons marked “Calculate payment” and “Adjust Principle”, rather than reacting each time a field is changed, no JS is required – as is the case for most of the other MiServer sample pages. Version 3.0 of MiServer will hopefully have a mechanism to update values of selected parts of the DOM without injecting JS. However, this example should hopefully demonstrate that you can write an APL server-side application which does *anything* using this technology.
Please take it for a spin – we are happy to receive comments on this blog, or via e-mail to apltools at dyalog dot com.
The DyaBot will of course be running a PiServer too. More about that next week, the bot is also coming to Iverson College.
 Follow