Or is it Minding Boggle Performance?

Better late than never? This was a blog post I started to write during COVID-19 and now I’ve finally gotten around to finishing it.
In the 2019 APL Problem Solving Competition, we presented a problem to solve the Boggle game . In Boggle, a player tries to make as many words as possible from contiguous letters in a 4×4 grid, with the stipulation that you cannot reuse a position on the board.
Rich Park’s webinar from 17 October 2019 presents, among other things, a very good discussion and comparison of two interesting solutions submitted by Rasmus Précenth and Torsten Grust. As part of that discussion, Rich explores the performance of their solutions. After seeing that webinar, I was curious about how my solution might perform.
Disclaimer
Please take note that performance was not mentioned as one of the criteria for this problem other than the implicit expectation that code completes in a reasonable amount of time. As such, this post is in no way intended to criticize anyone’s solutions – in fact, in many cases I’m impressed by the elegance of the solutions and their application of array-oriented thinking. I have no doubt that had we made performance a primary judging criterion, people would have taken it into consideration and possibly produced somewhat different code.
Goals
I started writing APL in 1975 at the age of 14 and “grew up” in the days of mainframe APL when CPU cycles and memory were precious commodities. This made me develop an eye towards writing efficient code. In developing my solution and writing this post, I had a few goals in mind:
- Use straightforward algorithm optimizations and not leverage or avoid any specific features in the interpreter. Having a bit of understanding about how APL stores its data helps though.
- Illustrate some approaches to optimization that may be generally applicable.
- Encourage discussion and your participation. I don’t present my solution as the paragon of performance. I’m sure there are further optimizations that can be made and hope you’ll (gently) suggest some.
The task was to write a function called FindWords that has the syntax:
found←words FindWords board
where:
wordsis a vector of words. We used Collins Scrabble Words, a ≈280,000-word word list used by tournament Scrabble™ players. We store this in a variable calledAllWords. Note that single letter words like “a” and “I” are not legitimate Scrabble words.boardis a matrix where each cell contains one or more letters. A standard Boggle board is 4×4.- the result,
foundis a vector that is a subset ofwordscontaining the words that can be made fromboardwithout revisiting any cells.
Although the actual Boggle game uses only words of 3 letters or more, for this problem we permit words of 2 or more letters.
Here’s an example of a 2×2 board:
     AllWords FindWords ⎕← b2← 2 2⍴'th' 'r' 'ou' 'gh'
┌──┬──┐
│th│r │
├──┼──┤
│ou│gh│
└──┴──┘
┌──┬───┬────┬─────┬─────┬──────┬───────┐
│ou│our│thou│rough│routh│though│through│
└──┴───┴────┴─────┴─────┴──────┴───────┘
First, let’s define some variables that we’ll use in our exploration:
      b4← 4 4⍴ 't' 'p' 'qu' 'a' 's' 'l' 'g' 'i' 'r' 'u' 't' 'e' 'i' 'i' 'n' 'a' ⍝ 4×4 board
      b6← 6 6⍴'jbcdcmvueglxriybgeiganuylvonxkfeoqld' ⍝ 6×6 board
If you’re using Dyalog v20.0 or later, you can represent this using array notation:
⍝ using array notation with single-line input:
      b4←['t' 'p' 'qu' 'a' ⋄ 's' 'l' 'g' 'i' ⋄ 'r' 'u' 't' 'e' ⋄ 'i' 'i' 'n' 'a']
      b6←['jbcdcm' ⋄ 'vueglx' ⋄ 'riybge' ⋄ 'iganuy' ⋄ 'lvonxk' ⋄ 'feoqld']

⍝ or, using array notation with multi-line input:
      b4←['t' 'p' 'qu' 'a'
          'slgi'
          'rute'
          'iina']

      b6←['jbcdcm'
          'vueglx'
          'riybge'
          'iganuy'
          'lvonxk'
          'feoqld']
The representation does not affect the performance or the result:
      b4 b6
┌──────────┬──────┐
│┌─┬─┬──┬─┐│jbcdcm│
││t│p│qu│a││vueglx│
│├─┼─┼──┼─┤│riybge│
││s│l│g │i││iganuy│
│├─┼─┼──┼─┤│lvonxk│
││r│u│t │e││feoqld│
│├─┼─┼──┼─┤│      │
││i│i│n │a││      │
│└─┴─┴──┴─┘│      │
└──────────┴──────┘
There were 9 correct solutions submitted for this problem. We’ll call them f1 through f9 – my solution is f0. Now let’s run some comparative timings using cmpx from the dfns workspace. cmpx will note whether the result of any of the latter expressions returns a different result from the first expression. We take the tally (≢) of the resulting word lists to make sure the expressions all return the same result. We assume that the sets of words are the same if the counts are the same. These timings were done using Dyalog v20.0 with a maximum workspace (MAXWS) of 1GB running under Windows 11 Pro. To keep the expressions brief I bound AllWords as the left argument to each of the solution functions:
f0←≢AllWords∘#.Brian.Problems.FindWordsTo make it easier to run timings, I wrote a simple function to call cmpx with the solutions of my choosing (the default is all solutions).
      )copy dfns cmpx
      time←{⍺←¯1+⍳10 ⋄ cmpx('f',⍕,' ',⍵⍨)¨⍺}
This allows me to compare any 2 or more solutions, or by default, all solutions on a given board variable name.
      time 'b4' ⍝ try a "standard" 4×4 Boggle board
  f0 b4 → 1.2E¯2 |      0%
  f1 b4 → 2.3E¯1 |  +1791% ⎕⎕
  f2 b4 → 4.3E¯1 |  +3491% ⎕⎕⎕
  f3 b4 → 7.3E¯1 |  +5941% ⎕⎕⎕⎕⎕
  f4 b4 → 5.6E0  | +46600% ⎕⎕⎕⎕⎕⎕⎕⎕⎕⎕⎕⎕⎕⎕⎕⎕⎕⎕⎕⎕⎕⎕⎕⎕⎕⎕⎕⎕⎕⎕⎕⎕⎕⎕⎕⎕⎕⎕⎕⎕
  f5 b4 → 1.1E0  |  +8758% ⎕⎕⎕⎕⎕⎕⎕⎕
  f6 b4 → 8.9E¯1 |  +7325% ⎕⎕⎕⎕⎕⎕
  f7 b4 → 1.1E0  |  +9275% ⎕⎕⎕⎕⎕⎕⎕⎕
  f8 b4 → 4.2E0  | +34750% ⎕⎕⎕⎕⎕⎕⎕⎕⎕⎕⎕⎕⎕⎕⎕⎕⎕⎕⎕⎕⎕⎕⎕⎕⎕⎕⎕⎕⎕⎕
  f9 b4 → 2.0E0  | +16291% ⎕⎕⎕⎕⎕⎕⎕⎕⎕⎕⎕⎕⎕⎕
If we try to run on the 6×6 sample
      0 1 2 3 4 5 6 7 9 time'b6'
  f0 b6 → 2.2E¯2 |       0%
  f1 b6 → 3.7E¯1 |   +1577%
  f2 b6 → 1.0E0  |   +4581%
  f3 b6 → 1.5E0  |   +6872%
  f4 b6 → 1.6E2  | +705950% ⎕⎕⎕⎕⎕⎕⎕⎕⎕⎕⎕⎕⎕⎕⎕⎕⎕⎕⎕⎕⎕⎕⎕⎕⎕⎕⎕⎕⎕⎕⎕⎕⎕⎕⎕⎕⎕⎕⎕⎕
  f5 b6 → 2.3E0  |  +10409% ⎕
  f6 b6 → 1.9E0  |   +8463%
  f7 b6 → 2.0E0  |   +9131% ⎕
  f9 b6 → 2.4E0  |  +10822% ⎕
f8 is excluded as it would cause a WS FULL in my 1GB workspace.
Why is f0 about 16-18 times faster than the next fastest solution, f1? I didn’t set out to make FindWords fast, it just turned out that way. Let’s take a look at the code…
     ∇ r←words FindWords board;inds;neighbors;paths;stubs;nextcells;mwords;mask;next;found;lens;n;m;map
[1]    inds←⍳⍴board                                      ⍝ board indices
[2]    neighbors←(,inds)∘∩¨↓inds∘.+(,¯2+⍳3 3)~⊂0 0       ⍝ matrix of neighbors for each cell
[3]    paths←⊂¨,inds                                     ⍝ initial paths
[4]    stubs←,¨,board                                    ⍝ initial stubs of words
[5]    nextcells←neighbors∘{⊂¨(⊃⍺[¯1↑⍵])~⍵}              ⍝ append unused neighbors to path
[6]    mwords←⍉↑words                                    ⍝ matrix of candidate words, use a columnar matrix for faster ∧.=
[7]    mask←mwords[1;]∊⊃¨,board                          ⍝ mark only those beginning with a letter on the board
[8]    mask←mask\∧⌿(mask/mwords)∊' ',∊board              ⍝ further mark only words containing only letters found on the board
[9]    words/⍨←mask                                      ⍝ keep those words
[10]   mwords/⍨←mask                                     ⍝ keep them in the matrix form as well
[11]   r←words∩stubs                                     ⍝ seed result with any words that may already be formed from single cell
[12]   :While (0∊⍴paths)⍱0∊⍴words                        ⍝ while we have both paths to follow and words to look at
[13]       next←nextcells¨paths                          ⍝ get the next cells for each path
[14]       paths←⊃,/(⊂¨paths),¨¨next                     ⍝ append the next cells to each path
[15]       stubs←⊃,/stubs{⍺∘,¨board[⍵]}¨next             ⍝ append the next letters to each stub
[16]       r,←words∩stubs                                ⍝ add any matching words
[17]       mask←(≢words)⍴0                               ⍝ build a mask to remove word beginnings that don't match any stubs
[18]       found←(≢stubs)⍴0                              ⍝ build a mask to remove stubs that no words begin with
[19]       lens←≢¨stubs                                  ⍝ length of each stub
[20]       :For n :In ∪lens                              ⍝ for each unique stub length
[21]           m←n=lens                                  ⍝ mark stubs of this length
[22]           map←(↑m/stubs)∧.=n↑mwords                 ⍝ map which stubs match which word beginnings
[23]           mask∨←∨⌿map                               ⍝ words that match
[24]           found[(∨/map)/⍸m]←1                       ⍝ stubs that match
[25]       :EndFor
[26]       paths/⍨←found                                 ⍝ keep paths that match
[27]       stubs/⍨←found                                 ⍝ keep stubs that match
[28]       words/⍨←mask                                  ⍝ keep words that may yet match
[29]       mwords/⍨←mask                                 ⍝ keep matrix words that may yet match
[30]   :EndWhile
[31]   r←∪r
     ∇
Attacking the Problem
Intuitively, this felt like an iterative problem. A mostly-array-oriented solution might be to generate character vectors made up from the contents of all paths in board and then do a set intersection with words. But that would be horrifically inefficient – there are over 12-million paths in a 4×4 matrix and, in the case of b4, there are only 188 valid words. What about a recursive solution (many of the submissions used recursion)? I tend to avoid recursion unless there are clear advantages to using it, and in this case I didn’t see any advantages, clear or otherwise. So, iteration it was…
I decided to use two parallel structures to keep track of progress:
paths– the paths traversed through the boardstubs– the word “stubs” built from the contents of the cells inpaths
paths is initialized to the indices of the board, and stubs is initialized to the contents of each cell. Then iterate:
- Keep any
stubsthat are inwords - Append the contents of each candidate’s unvisited neighboring cells to the candidates, resulting in a new candidates list
- Repeat until there’s nothing left to look at
Setup
First, I need to find the adjacent cells for each cell in board.
[1]    inds←⍳⍴board                                      ⍝ board indices
[2]    neighbors←(,inds)∘∩¨↓inds∘.+(,¯2+⍳3 3)~⊂0 0       ⍝ matrix of neighbors for each cell
You might recognize line [2] as a stencil-like (⌺) operation. Why, then, didn’t I use stencil? To be honest, it didn’t occur to me at the time – I knew how to code what I needed without using stencil. As it turns out, for this application, stencil is slower. The stencil expression is shorter, more “elegant”, and possibly more readable (assuming you know how stencil works), but it takes more than twice the time. Granted, this line only runs once per invocation so the performance improvement from not using it is minimal.
      inds←⍳4 4
      ]RunTime -c '(,inds)∘∩¨↓inds∘.+(,¯2+⍳3 3)~⊂0 0' '{⊂(,⍺↓⍵)~(⍵[2;2])}⌺3 3⊢inds'

  (,inds)∘∩¨↓inds∘.+(,¯2+⍳3 3)~⊂0 0 → 2.2E¯5 |    0% ⎕⎕⎕⎕⎕⎕⎕⎕⎕⎕⎕⎕⎕⎕⎕⎕⎕⎕
  {⊂(,⍺↓⍵)~(⍵[2;2])}⌺3 3⊢inds       → 5.0E¯5 | +127% ⎕⎕⎕⎕⎕⎕⎕⎕⎕⎕⎕⎕⎕⎕⎕⎕⎕⎕⎕⎕⎕⎕⎕⎕⎕⎕⎕⎕⎕⎕⎕⎕⎕⎕⎕⎕⎕⎕⎕⎕
I wrote a helper function nextcells which, given a path, returns the unvisited cells adjacent to the last cell in the path. For example, if we have a path that starts at board[1;1] and continues to board[2;2], then the next unvisited cells for this path are given by:
      nextcells (1 1)(2 2)
┌─────┬─────┬─────┬─────┬─────┬─────┬─────┐
│┌───┐│┌───┐│┌───┐│┌───┐│┌───┐│┌───┐│┌───┐│
││1 2│││1 3│││2 1│││2 3│││3 1│││3 2│││3 3││
│└───┘│└───┘│└───┘│└───┘│└───┘│└───┘│└───┘│
└─────┴─────┴─────┴─────┴─────┴─────┴─────┘
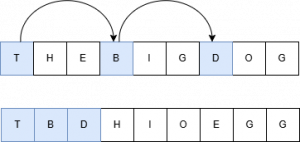
A contributor to improved performance is set up next. I created a parallel transposed matrix copy of words.
[6] mwords←⍉↑words ⍝ matrix of candidate words, use a columnar matrix for faster ∧.=Why create another version of words and why is it transposed?
- In general, it’s faster to operate on simple arrays.
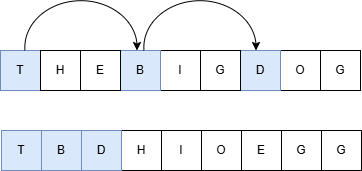
- Simple arrays – arrays containing only flat, primitive, data without any nested elements – are stored in a single, contiguous, block of memory. Elements are laid out contiguously in row-major order, meaning the last dimension changes fastest. For a 2D matrix, it stores the first row left-to-right, then the second row, and so on. Transposing the word matrix makes prefix searching as we look for candidates that could become valid words much more efficient. Consider a matrix consisting of the words “THE” “BIG” “DOG”. If stored one word per row, the interpreter has to “skip” to find the first letter in each word. However, in a column-oriented matrix the first letters are next to one another and likely to be in cache, making them much quicker to access.
Things Run Faster If You Do Less Work
Smaller searches are generally faster than larger ones. If we pare down words and stubs as we progress, we will perform smaller searches. The first pass at minimizing the data to be searched is done during setup – we remove any words that don’t begin with a first letter of any of board‘s cells as well as words that contain letters not found in board:
[7]    mask←mwords[1;]∊⊃¨,board               ⍝ mark only those beginning with a letter on the board
[8]    mask←mask\∧⌿(mask/mwords)∊' ',∊board   ⍝ further mark only words containing only letters found on the board
[9]    words/⍨←mask                           ⍝ keep those words
[10]   mwords/⍨←mask                          ⍝ keep them in the matrix form as well
For board b4, this reduces the number of words to be searched from 267,752 to 16,247 – a ~94% reduction. Then we iterate, appending each path’s next unvisited cells and creating new stubs from the updated paths:
[13]       next←nextcells¨paths                      ⍝ get the next cells for each path
[14]       paths←⊃,/(⊂¨paths),¨¨next                 ⍝ append the next cells to each path
[15]       stubs←⊃,/stubs{⍺∘,¨board[⍵]}¨next         ⍝ append the next letters to each stub
Append any stubs that are in words to the result:
[16] r,←words∩stubs ⍝ add any matching words
Because a cell can have more than one letter, we might have stubs of different lengths, so we need to iterate over each unique length:
[19]       lens←≢¨stubs           ⍝ length of each stub
[20]       :For n :In ∪lens       ⍝ for each unique stub length
Because we’re doing prefix searching, the inner product ∧.= can tell us which stubs match prefixes of which words. Now we can see the reason for creating mwords. Since the data in mwords is stored in “raveled” format, n↑mwords quickly returns a matrix of all n-length prefixes of words:
[21]           m←n=lens                    ⍝ mark stubs of this length
[22]           map←(↑m/stubs)∧.=n↑mwords   ⍝ map which stubs match which word beginnings
[23]           mask∨←∨⌿map                 ⍝ words that match
[24]           found[(∨/map)/⍸m]←1         ⍝ stubs that match
[25]       :EndFor
We then use our two Boolean arrays, found and mask, to pare down paths/stubs and words/mwords respectively. If we look at the number of words and stubs at each step, we can see that the biggest performance gain is realized by doing less work:
┌──────────────────┬───────┬──────┐
│Phase             │≢words │≢stubs│
├──────────────────┼───────┼──────┤
│Initial List      │267,752│     0│
├──────────────────┼───────┼──────┤
│After Initial Cull│ 16,247│    16│
├──────────────────┼───────┼──────┤
│After 2-cell Cull │  7,997│    56│
├──────────────────┼───────┼──────┤
│After 3-cell Cull │  2,736│   152│
├──────────────────┼───────┼──────┤
│After 4-cell Cull │  1,159│   178│
├──────────────────┼───────┼──────┤
│After 5-cell Cull │    371│   119│
├──────────────────┼───────┼──────┤
│After 6-cell Cull │     87│    42│
├──────────────────┼───────┼──────┤
│After 7-cell Cull │     16│    10│
├──────────────────┼───────┼──────┤
│After 8-cell Cull │      2│     1│
├──────────────────┼───────┼──────┤
│All Done          │      0│     0│
└──────────────────┴───────┴──────┘
Does mwords Make Much of a Difference?
As an experiment, I decided to write a version, f10, that does not used transposed word matrix mwords (it still does the words and stubs culling). I compared it to my original version,f0, and the fastest submitted version, f1:
      0 1 10 time 'b4'
  f0  b4 → 1.4E¯2 |     0% ⎕⎕
  f1  b4 → 2.2E¯1 | +1551% ⎕⎕⎕⎕⎕⎕⎕⎕⎕⎕⎕⎕⎕⎕⎕⎕⎕⎕⎕⎕⎕⎕⎕⎕⎕⎕⎕⎕⎕⎕⎕⎕⎕⎕⎕⎕⎕⎕⎕⎕
  f10 b4 → 2.1E¯1 | +1422% ⎕⎕⎕⎕⎕⎕⎕⎕⎕⎕⎕⎕⎕⎕⎕⎕⎕⎕⎕⎕⎕⎕⎕⎕⎕⎕⎕⎕⎕⎕⎕⎕⎕⎕⎕⎕⎕
Interestingly, f10 performed remarkably close to f1. When I looked at the code for f1, I saw that the author had implemented a similar culling approach and had commented in several places that the construct was to improve performance. Good job! But this does demonstrate that maintaining a parallel, simple, copy of words makes the solution run about 15× faster.
Takeaways
There are a couple of other optimizations I could have implemented:
- In the setup, I could have filtered out all words that were longer than
≢∊board. - If this
FindWordswas used a lot, and I could be fairly certain thatwordswas static (unchanging), then I could createmwordsoutside ofFindWords. The line that createsmwordsconsumes about half of total time of the function.
When thinking about performance and optimization:
- Unless there’s an overwhelming reason to do so – don’t sacrifice code clarity for performance. If you implement non-obvious performance improvements, note them in comments or documentation.
- Optimize effectively – infinitely speeding up a piece of code that contributes 1% to an application’s CPU consumption makes no real impact.
- Consider how your data is structured and how that might affect performance. In this case, representing
wordsas a vector of words is convenient, readable, and there aren’t those extra spaces that might occur in a matrix format. But as we saw, it performs poorly compared to a simple matrix format. Don’t be afraid to make the data conform to a more performant organization. - Along similar lines, consider how simple arrays are stored in contiguous memory and whether you can take advantage of that.
In case you were wondering, the two solutions Rich Park looked at in his webinar were f4 and f7 in the timings above. The fastest submission, f1, was submitted by Julian Witte. Please remember that we did not specify performance as a criterion for the problem, so this is in no way a criticism of any of the submissions.
If you’re curious to look at the code for the submissions, this .zip file includes namespaces f0–f9, each of which contains a FindWords function and any needed subordinate functions (in addition to the solution namespaces, the .zip file also includes AllWords, the time function and 4 sample boards – b2,b3,b4, and b6). You can extract and use the code as follows:
- Unzip Submissions.zip to a directory of your choosing.
- In your APL session, enter:
]Link.Import # {the directory you chose}/Submissions
This step might take several seconds whenLink.Importbrings inAllWords
You can then examine the code, run your own timings, and so on. One interesting thing to explore is which submissions properly handle 1×1 and 0×0 boards.
Postscript
When I started to write the explanation of my code, it occurred to me: “This is 2026 and we have LLMs that might be able to explain the code. Let’s give them a try…”
So, I asked each of Anthropic’s Claude Opus 4.6 Extended, Google’s Gemini Pro, and Microsoft’s Copilot Think Deeper the following:
Explain the attached code. Note that a cell in board can have multiple letters like “qu” or “ough”. Also note that the words list is the official scrabble words list and has no single letter words.
The results were interesting and, in several places, a more concise and coherent explanation than I might produce. But how accurate and useful were their explanations? Stay tuned for a blog post about how well different LLMs explain APL code!
 Follow